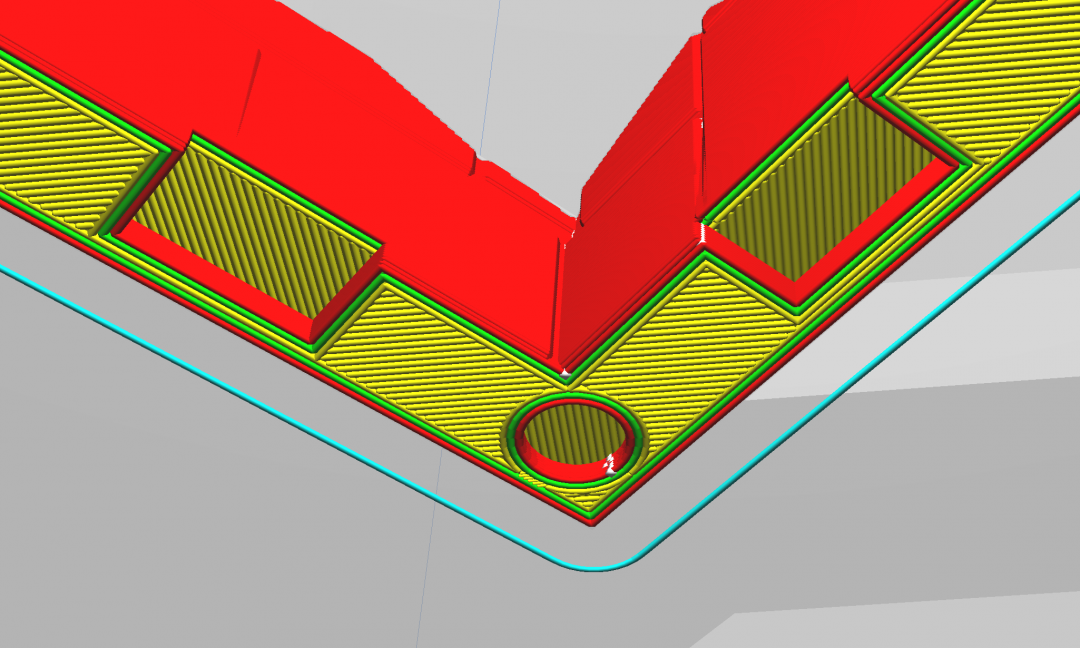
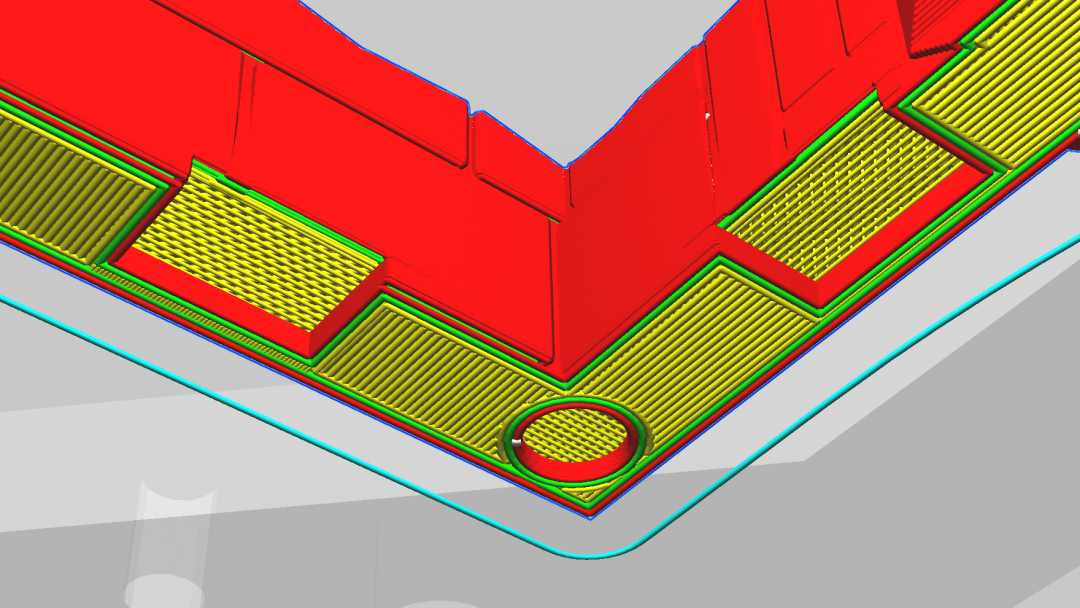
This is a new Voron 2.4r2 350mm build based on a Unique Prints 350mm kit. This is far from the cheapest you can build a Voron for (<$2k landed for a BOM Voron iirc) – there is a mixture of mods, some of which are aimed at increased reliability/speed/consistency and some which are just because I felt like doing them. I learned a lot from the previous 2.4r2 300mm build and if that is anything to go by it should be a reliable workhorse. Update: Some 3,500 hours later that has proved to the the case.
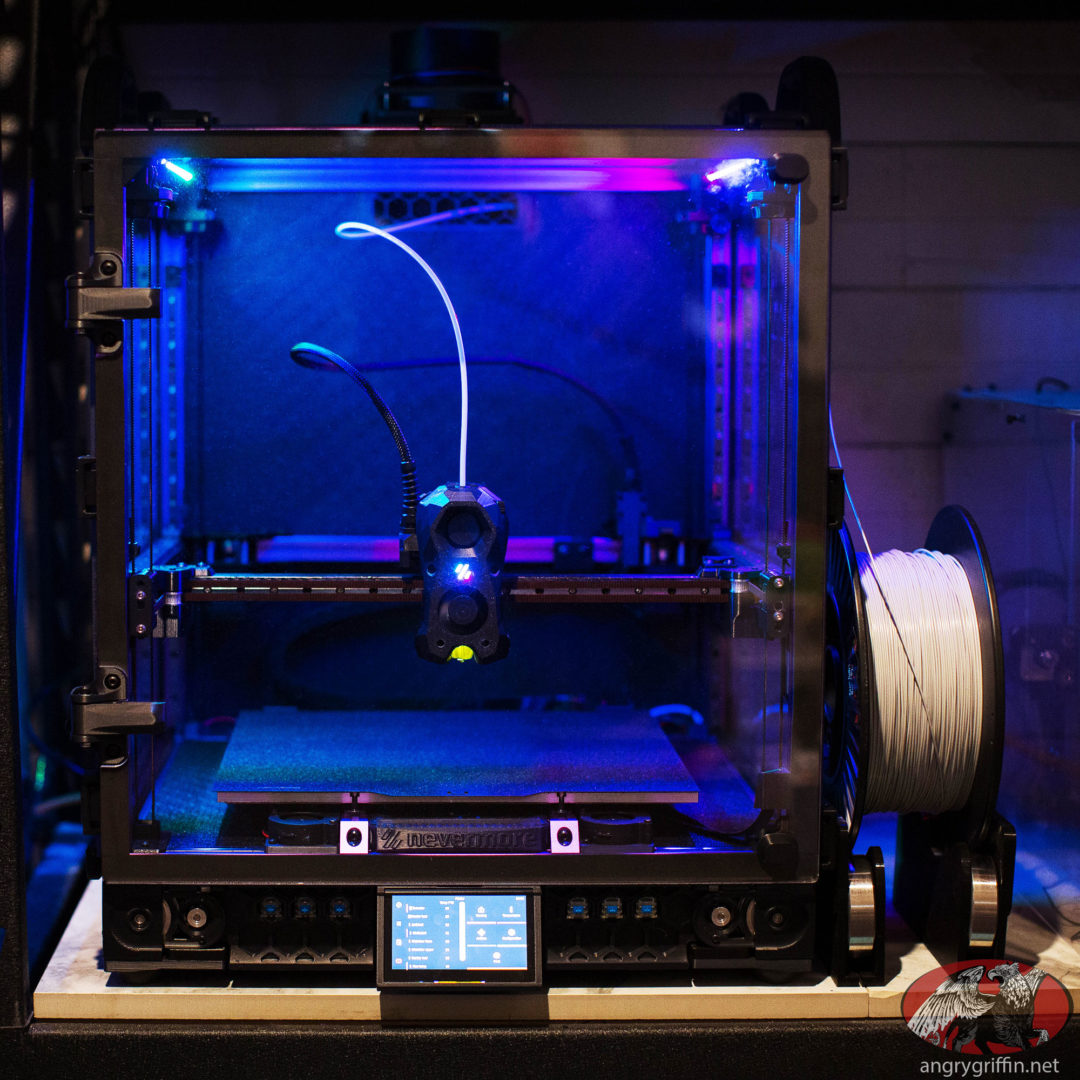
The current total cost is $4928.72 of build cost and so far has required $236.21 of replacement parts (AUD). That includes a couple of hundred bucks of tools – I wouldn’t have purchased them otherwise and they haven’t been used on anything but the Voron so they’re included in that total too. It’s not the most cost efficient nor fastest 2.4 out there by a long shot, but it was never meant to be either of those things. Links in the below sections may be affiliate links.
Kit Unique Prints Voron 2.4r2 350mm Kit
Quite a kit! It doesn’t have a pre-made harness unlike the LDO kit but after actually building one of either kits the thing that makes the big difference in this kit is the Wago mounts – it really does make the wiring modular and simpler to do.
I made the following changes to the kit pre-purchase:
- TAP kit instead of OMRON TL-Q5MC2
- Dropped the LDO-36STH20-1004AHG Pancake Stepper Motor
- Dropped the cable chain kit as I was re-using the X/Y chains from the 300 as the Z chain
- Dropped the 60w 24v hotend heater cartridge – not using it, using a Rapido
- Changed the LRS-200-24 to the UHP-200-24
- Upgraded the motor kit XY motors from 2x LDO-42STH48-2004AC(VRN) to 2x LDO-42STH48-2504AH
- Upgrade the MINI12864 Display Screen to BTT Pi TFT 43 display
- Added Titanium Gantry Backers
Cost: $2,502.50.
Thoughts on the kit? Excellent. Fasteners were all of high quality, as was the provided wire and the Misumi nuts are a revelation after struggling with the quality of the previous 300 build’s LDO roll in nuts. The bed is 8mm thick (standard) vs. the LDO kit’s 10mm, but it’s flat and I am not noticing any substantial in-use differences. The Eight Tool wrench set that’s included is a really nice set, on pare with my Wise and I’d rank it above the Bondhus set I have.
Hardware: VZ-Hextrudort-Low extruder
As seen on Github. I bought an aluminium CNC version with the Moons stepper and an 8T gear (later moved to a LDO motor and a 10T gear to get better gear meshing). I am using an LGX Lite with the 300mm which has been great, but decided to try out the Hextrudort as it promised a little less weight and good concentricity of the gears.
Downsides: Can’t use the SB2240 I was originally intending to use as the filament tension screw obstructs it. EBB36 is the order of the day.
Cost: $125.37.
In use it’s excellent so far, no complaints whatsoever. The stock wiring arrangement for the plug was correct for the EBB36 without having to re-pin. I ended up at:
rotation_distance: 22.0546The direction which worked for me:
step_pin: can0:PD0
dir_pin: !can0:PD1
enable_pin: !can0:PD2
There’s a video on setting the correct tension here – turns out I was running mine too tight which was causing a blob to form on the end of the filament when unloading, which was regularly getting jammed and causing a great deal of annoyance. Here’s hoping this fixes it:
Hardware: EBB36 CAN
After having success for 2500+ hours on my 300mm 2.4r2 with an EBB36 I was happy to use it again. I went with the MAX31865 chip which ended up being a dud so I might as well have bought one without it! Bought from here.
My 300mm 2.4 had wires in the cable chains fail at 300 hours, and has had zero issues with the umbilical/CAN setup in 2500 hours of printing with it – given the lessened weight/complexity I’m a big fan.
Downside vs. the SB2209/2240 style is that you don’t get the fancy Stealthburner plug/unplug feature. I haven’t taken the front off the 300’s Stealthburner in 2500 hours of printing though so I don’t anticipate missing that a great deal.
The Rapido’s PT1000 sensor required a 2200ohm resistor set in the config. For some reason it took me a while to find the document which showed that. For using the PT1000 sans MAX31865:
sensor_pin: can0:PA3
sensor_type: PT1000
pullup_resistor: 2200
In the end the PT1000-equipped Rapido seemed to have an issue and I replaced it with a spare that had a ATC Semitec 104NT-4-R025H42G thermistor instead which worked with no issue once the PT1000 jumper was removed.
The board has an ADXL chip built-in and the default config worked fine:
[adxl345]
cs_pin: can0:PB12
spi_software_sclk_pin: can0:PB10
spi_software_mosi_pin: can0:PB11
spi_software_miso_pin: can0:PB2
axes_map: x,y,z

[resonance_tester]
accel_chip: adxl345
probe_points:
    175,175,20
Cost: $42.51.
Hardware: LDO-42STH48-2504AH A/B motors
I was chasing the fastest/quietest A/B motors and this is what Unique Prints suggested.
Total cost: Rolled into the kit.
Thoughts: Noticeably quiet and they don’t seem to have an issue running at slower speeds, not just at 300mm/s. Very pleased. Relatively speaking they are a LOT quieter than my 300’s LDO-42STH48-2004AC(VRN) motors.
Hardware: Titanium Gantry Backers
The theory behind them is on this Github. Can’t say that I ever tried the 300 without them, and I have had good consistent results with them installed there so went the same way this time.
Cost: Rolled into the kit, separate product page here.
Thoughts: The data is there to back up their use and given I was chasing solid, repeatable prints it seemed a no-brainer. I haven’t done back to back testing and have no intention of doing so.
Hardware: BigTreeTech Pi TFT 43 display
Totally not necessary but it sure does look nicer than the BOM screen. I used this mount on the advice of Unique Prints and it worked just fine. Available from Ali Express or Unique Prints.
It turns out that the Raspberry Pi camera and display use the same cable type, which for some reason was not very straight forward to find out. The cable that the TFT43 comes with is designed to hook the screen up to a Pi that’s attached to the back of it, which is woefully short of where I had installed the Pi in the electronics bay. Fixed with a longer cable.
Just worked with zero effort upon installing Klipperscreen.
Cost: Rolled into the kit, and the 600mm cable was $11.01.
Thoughts: The screensaver is somewhat obnoxious and is a repeating pattern of colours on what seems to be max brightness – this is fixed by going into the settings and disabling the screen DPMS. Klipperscreen on this is excellent and it’s definitely a lot more user friendly than the old monochrome display/interface.
Hardware: Aluminium A/B plates
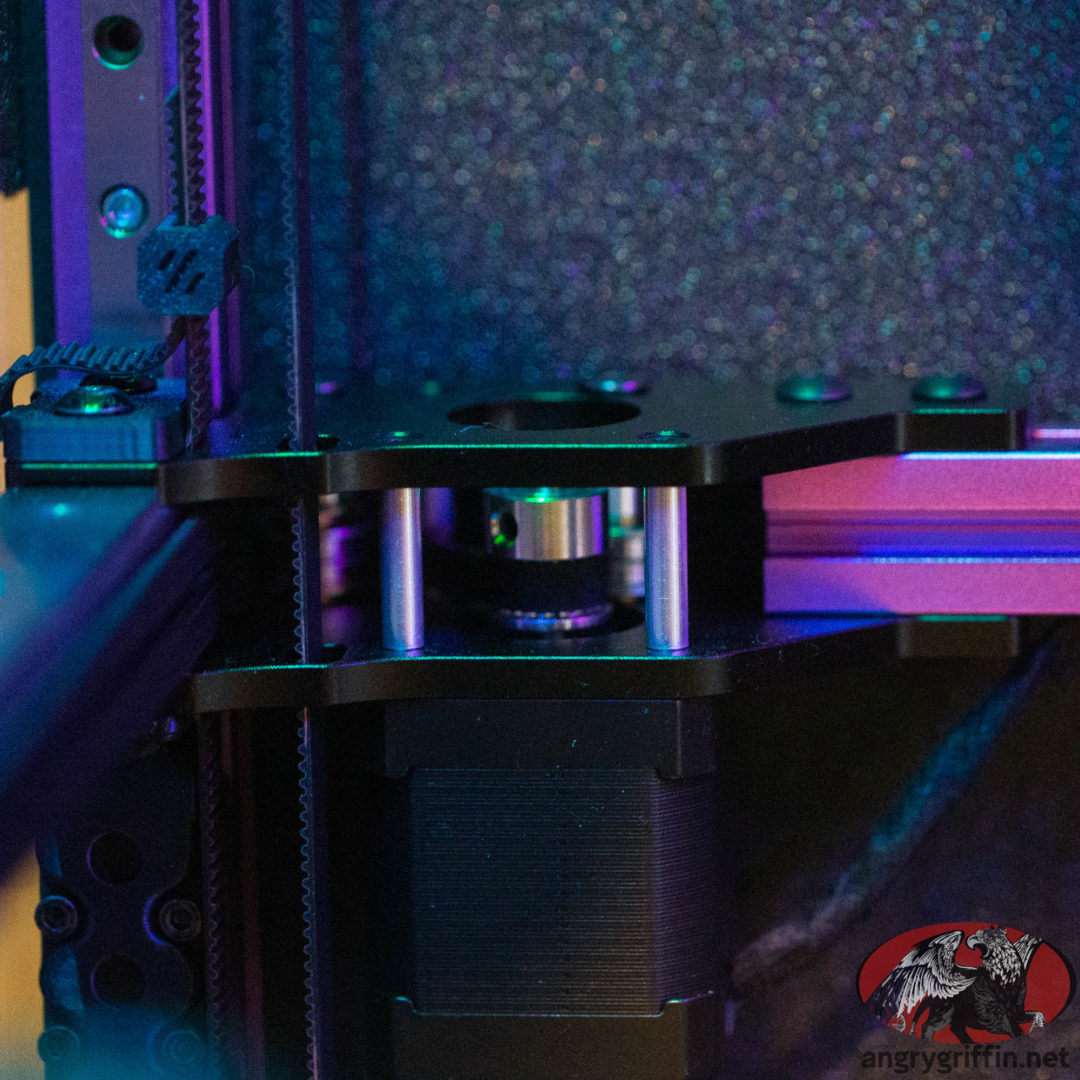
These act as a heatsink to keep the motors a bit cooler. Are they lighter than the printed pieces? Honestly haven’t checked, but looking around online suggests not. Doubtful that’s an issue given that it’s only the Z motors that will be seeing that weight. Bought from here.
One downside is that the bolts aren’t shouldered so the bearings ride on threads.
Cost: $65.38.
Hardware: Rainbow BARF Stealthburner LEDs
Totally unnecessary, but fun. The cable was very short – only just enough to reach a toolhead board – and had to be extended to reach the EBB36. Bought from here.
Cost: $20.22.
Hardware: 2020 profile flat seals
Not strictly necessary by any means, but it keeps random junk from accumulating in the 2020 profiles under the bed. Also means I can wipe any junk out from the sides of the bed without worrying about it catching in the profiles at the front. Bought from here.
Cost: $17.25.
Hardware: Additional Fasteners
I ran out of fasteners eventually from the kit – which is unsurprising as I added a lot of stuff.
More heatset inserts: Ali Express, 200 for $26.97
More HNTAJ5-3: Misumi, 174 for $114.36
M3 and M5 bolts: $34.24
M3 16mm bolts: $2
Hardware: Raspberry Pi heatsinks
Gotta keep that Pi cool.
Cost: $5.50, in with the order for the flex cables for the TFT43 display.
Hardware: Raspberry Pi Camera
Went for the V2 wide angle camera with a 1M cable. Mounted with the Picam corner mount found on Github here.
Field of view:
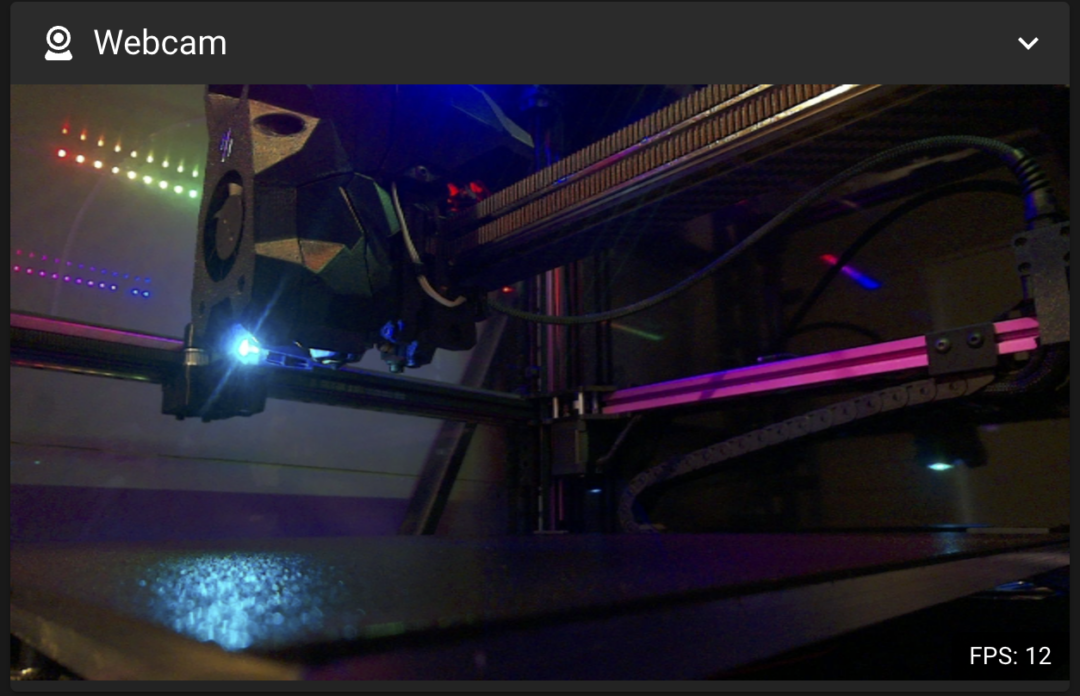
Cost: $75.31.
Thoughts: Still can’t get it to work with Bullseye – need to work on this.
Hardware: Daybreak Neo LED strips
Fancy RGB Neopixel strips. One for either side, bought from Dremc. Chamber lighting with style. Totally not strictly necessary but pleased I got them as having gently breathing rainbow colours is aesthetically pleasing!
Cost: $70.83
Hardware: Additional Powdercoated Sheet
Particularly when printing ABS prints back to back it’s really convenient having a second sheet ready to go so you can a) let the print cool down and come off the bed of it’s own accord and b) not have to wait for the sheet to cool down before cleaning.
I went with the black one from Unique Prints, although note that it’s single sided unlike their gold ones!
Cost: $92.50
Thoughts: In use it’s a great sheet, though if/when I replace it I’ll be going with the gold two-sided version as it’s marginally cheaper and you get two sides to use, rather than just one…
Hardware: Raspberry Pi 4 4GB
Picked it up from Core Electronics.
To get the Pi to appear as an MCU in Klipper and then to get temperatures I added this to the printer.cfg:
[mcu rpi]
serial: /tmp/klipper_host_mcu

[temperature_sensor raspberry_pi]
sensor_type: temperature_host
min_temp: 0
max_temp: 100
Cost: $99.01.
Hardware: Carbon Fibre X Beam
Light and strong? Yes please! I went with the 2mm thick gantry beam from Unique Prints. Comes with all the fasteners.
Weighs 86gm vs. the 2020’s 202gm – 116gm shed.
Cost: $109.95 delivered.
Hardware: Probe choice of Voron Tap
Slows you down but oh so reliable. Github here. I lost close to 2k accels on the graph on the 300mm after installing this but my Z offset became a non-issue and it prints perfect first layers every time with nothing required if I change plates or nozzles. I have tried the stock Omron probe, Klicky and Euclid and this is the solution I like best for consistency. Definitely not as fancy as the docking/undocking procedure and the accels loss is a shame but worth it for my use case.
Cost: Included in the Unique Prints kit.
Thoughts: R8 is a lot better than R6 in terms of the X axis graph, about the same on the Y for me. Tap itself is a great bit of kit and I’m seeing extremely consistent first layers every time – very pleased. No nozzle scrubbing, just a purge line before the print.
Hotend: Rapido HF
PT1000 sensor, good flow (hitting 25mm^3/s on the 300mm for PLA and ABS without any drama whatsoever), fits the Stealthburner no problems… what’s not to love? Bought from 3DBro.
Cost: $128.60.
Thoughts: Well, the PT1000 one kept on getting filament caught in the heatbreak which is still a slight mystery to me – I replaced it with a spare which just worked with the same filament, so I’ll go investigating this later. Brilliant hotend, performing well.
Hardware: Annex K3-Style Door Kit

Single piece “thunk” door via Orvil3D. It’s sealed around the front and has no gap right up the middle so I am hoping that it’ll improve the airtightness of the enclosure, making sure that there are fewer places that fumes may leak out when the exhaust fans are on low printing ABS.
Cost: $95.00.
Thoughts: It really does cut down on the fan noise that comes out through the front, and that thunk is ever so satisfying.
Update at 150-200 hours – Chamber temps of >55deg result in the door warping enough that it needs a latch to keep it shut. Keeping the temps below that stop it from happening and the door seems to return to it’s original shape once it cools down.
Hardware: 3M VHB Double Sided Tape
This came in the LDO kit I used for the 300 and I liked it for adhering stuff to the underside of the deck, like the cable management ducts. I got some via eBay.
Cost: $9.99
Hardware: Samsung T5 500GB
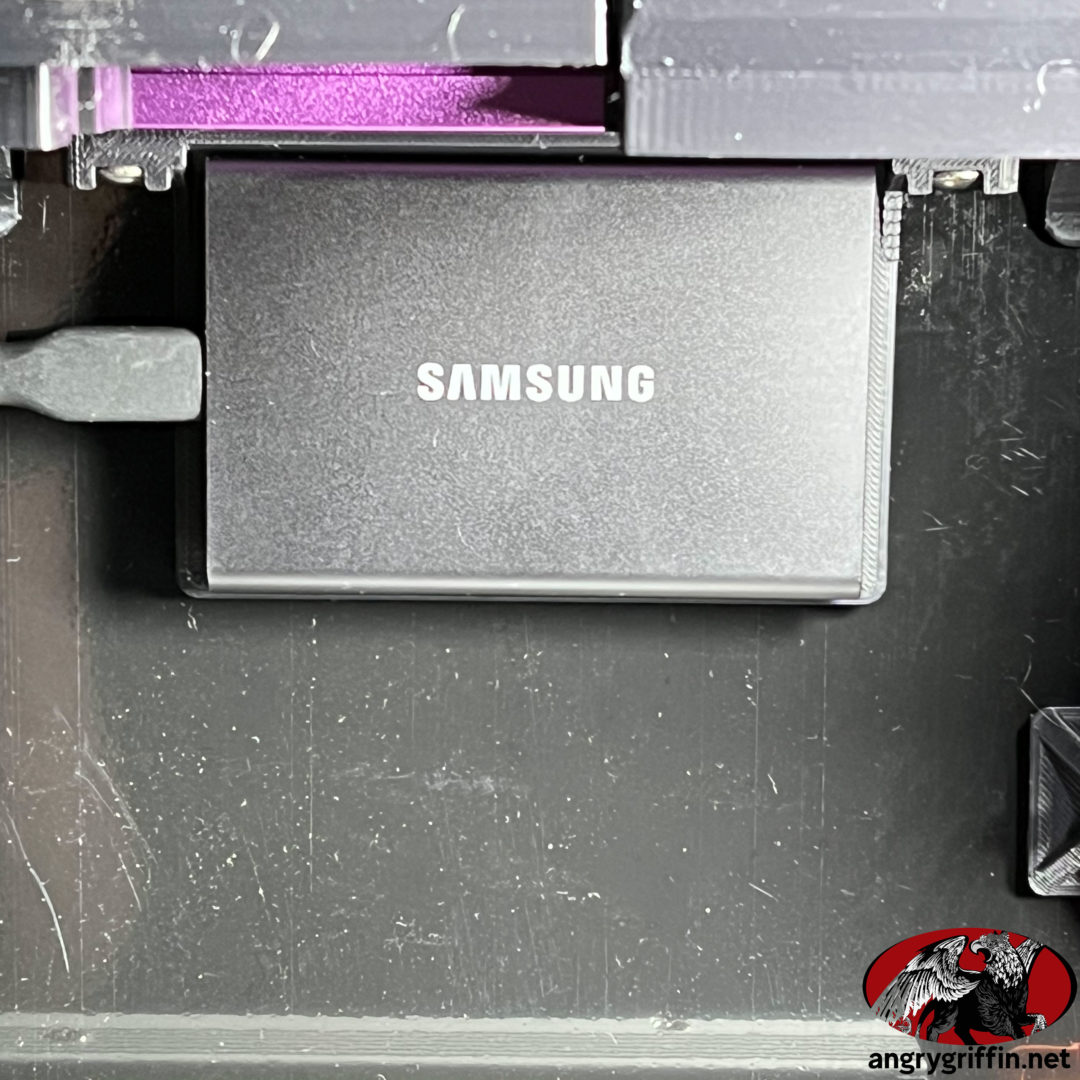
Also overkill, but I had this laying around from another project and it wasn’t in use. The Pi boots from a SSD with barely any effort at all and it’ll cope better with rewrites etc. long-term than a MicroSD Card.
The Mainsail file interface on my 300 slows down substantially as the card fills up so here’s hoping that this doesn’t.
Hardware: Black 3mm and 1mm adhesive foam
Hardware: Hotend fan with tacho: Orion OD4010-24HB01A
9.2 CFM (0.258m³/min) airflow and 0.200 in H2O (49.8 Pa) static pressure. 1.45W, ball bearing, 33.4dB. Has been a great fan in the 300 and the RPM sensing saved my toolhead once so far after the fan stalled due to debris. I wouldn’t build a Voron without that safety/time-saving feature (reprinting and rebuilding a hotend after a fan failure isn’t something I want to spend time on).
Andrew Ellis has macros and whatnot for that here.
Hooked up to one of the i2C pins:
tachometer_pin: ^can0:PB7
Cost: $25.46 via Digikey.
Hardware: CANbus cooling fan – MF20100V2-1000U-G99
A cute little 20x10mm 5v fan for keeping air moving past the EBB36 board. Fits the CB-C2 rear door. Works well at keeping temps down.
Cost: $15.16.
Hardware: Noctua electronics bay fans
The two GDSTime 60mm fans are rather noisy, so I replaced them with two Noctua NF-A6x25 FLX (eBay AU) 3000rpm fans. The GDSTime fans were destined for exhaust fan duty but I went with a 120mm fan instead to see how that went.
Quieter at 100% than the GDSTime fans were at 60%, and they seem to move enough air to keep the components cool even in a reasonably hot room (45deg Celsius ambient). Worth the cost when I’m trying to keep the ambient noise down in a room full of printers – it gets a bit oppressive when there is too much fan noise.
Cost: $74.
Hardware/STL: Ellis’ Bed Fans
Two fans for the bed, one on each outside edge of the bed rails. Github here.
I picked up a two-pack of cheap fans on eBay but man, there’s not much metal in those wires… we’ll see how long they last. So far so good, but it’s remarkable how many fewer strands there are compared to, say, a Delta.
Cost: $14.95.
Hardware/STL: RBPB5 Bearing Mod
The Github is here. If you’re doing this don’t forget to install the M5x22 bolts before pressing the bearings into the carriers, as you can’t do it later and can’t get them out without destroying the carriers…
I turned down the heads to 8.15mm diameter.
The angles at which the gantry can sit vs. the BOM setup is remarkable – especially after following Ellis’ tuning guide on the 300mm and really cranking the Z joints down after de-racking and a heat soak to “lock in” the QGL somewhat. This feels really odd in comparison, but the flexion is nice and smooth. We shall see!
Cost: $73.42 for four bearings with shipping from Misumi. $20.26 for a pack of DIN433 M5 washers and some M5x25mm button head socket screws.
Thoughts: I ended up moving the toolhead to the front of the printer rather than the rear to mitigate the droop at the back, which was sufficient to cause issues on QGL sometimes. The relevant part of the print_end macro:
    G0 X{th.axis_maximum.x//2} Y{th.axis_minimum.y + 5} F3600  ; park nozzle at front

Instead of:

    G0 X{th.axis_maximum.x//2} Y{th.axis_maximum.y - 2} F3600  ; park nozzle at rear
Hardware/STL: Nevermore Duo V5 filter
Even if you aren’t filtering things it makes a difference to the chamber temperatures for printing ABS and the like.
Cost: I used the 12v fan from the Unique Prints kit that was meant for the hotend parts cooling fan, and bought another 5015 fan for $17.00. Fasteners came from the kit or the additional ones I purchased. A bag of carbon pellets for it was $24.75.
Hardware/STL: Redoubt Idlers
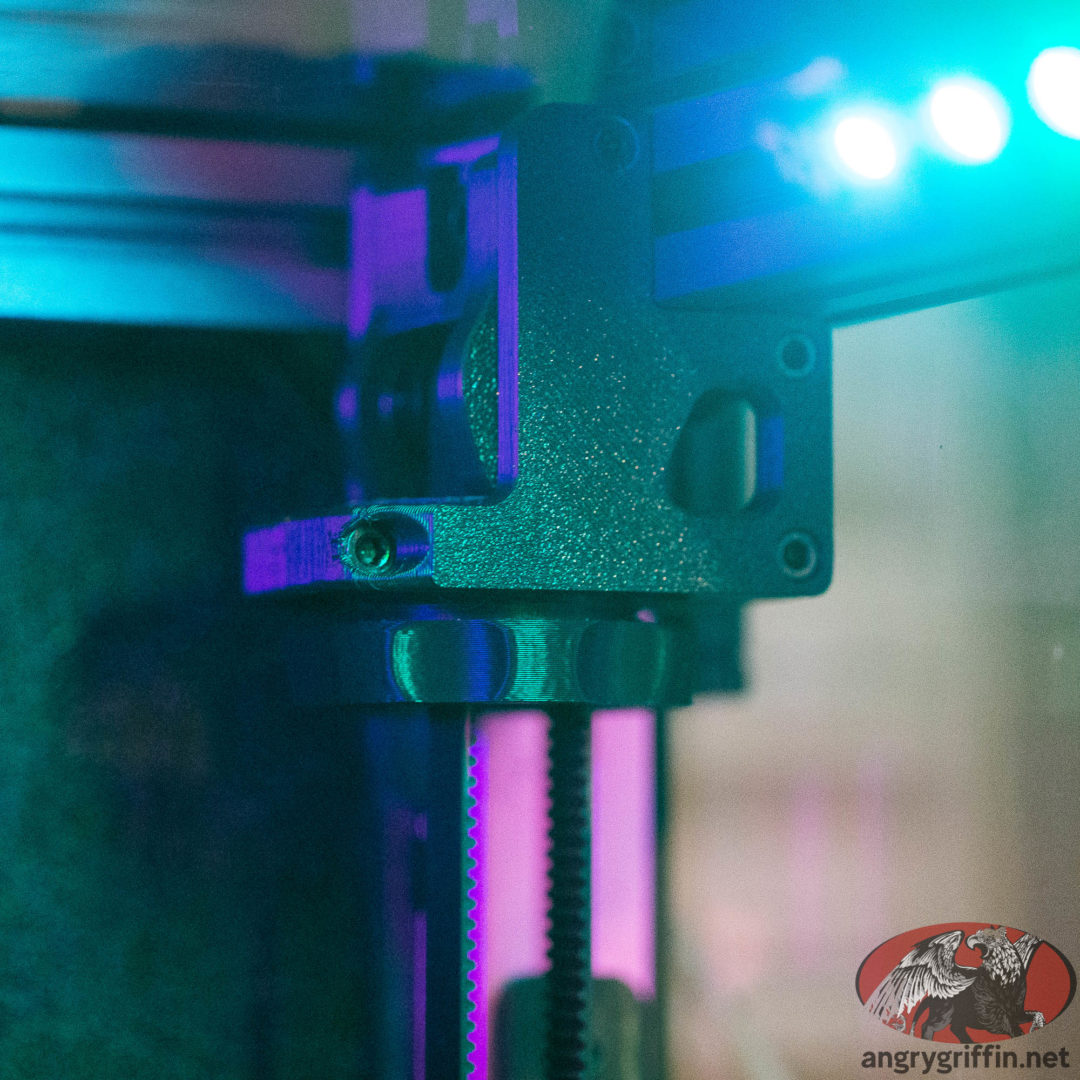
The Redoubt idlers (the Redoubt Github is here) can use 625 bearings and a pulley on a 30mm long D-cut shaft, and require some M5x16mm SHCS in addition to the regular Voron BOM. They also bolt to two separate extrusions. The big screw is not as easy to turn as you’d expect, and it looks like some Z will be lost – whether it’s more than the CAN setup loses I don’t yet know! I eventually got sick of waiting for the M5x16mm SHCS in the post and modified the files by 0.5mm to allow for some M5x16mm BHCS I had spare from the last Voron build and used those instead.
They’re honestly not as easy to turn as I had anticipated after seeing their nice chunky handles, so I made a handle to turn them with and they’re miles easier.
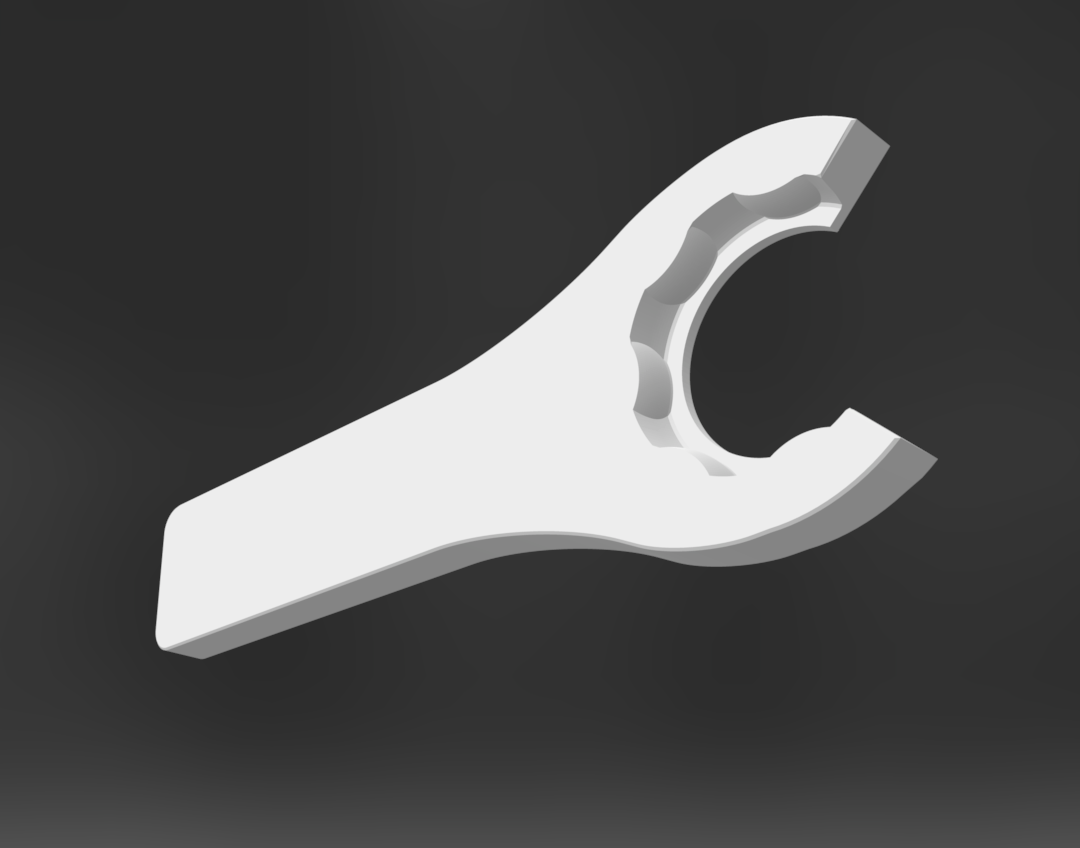
Worth the cost? No! If I just had the parts laying around or could have waited for stuff to arrive from Ali Express, I’d do it again, but it’s not made the printer >$100 better or easier to use.
Cost: 8x MR625-2RS bearings and four 11mm wide Gates 2GT 20T Pulley Black for $68.75. Four 30mm D-shape shafts for said bearings/pulleys ran to $55.46.
STL: LDO’s Z rail stops
Totally not strictly necessary but was good peace of mind for stopping the Z carriages sliding off when the printer was being turned upside down during assembly. Cost almost nothing in filament. Not needed once the gantry and Z idlers are installed as the bearings don’t reach the top any longer.
Cost: Negligible amount of filament.
STL: Belt clips
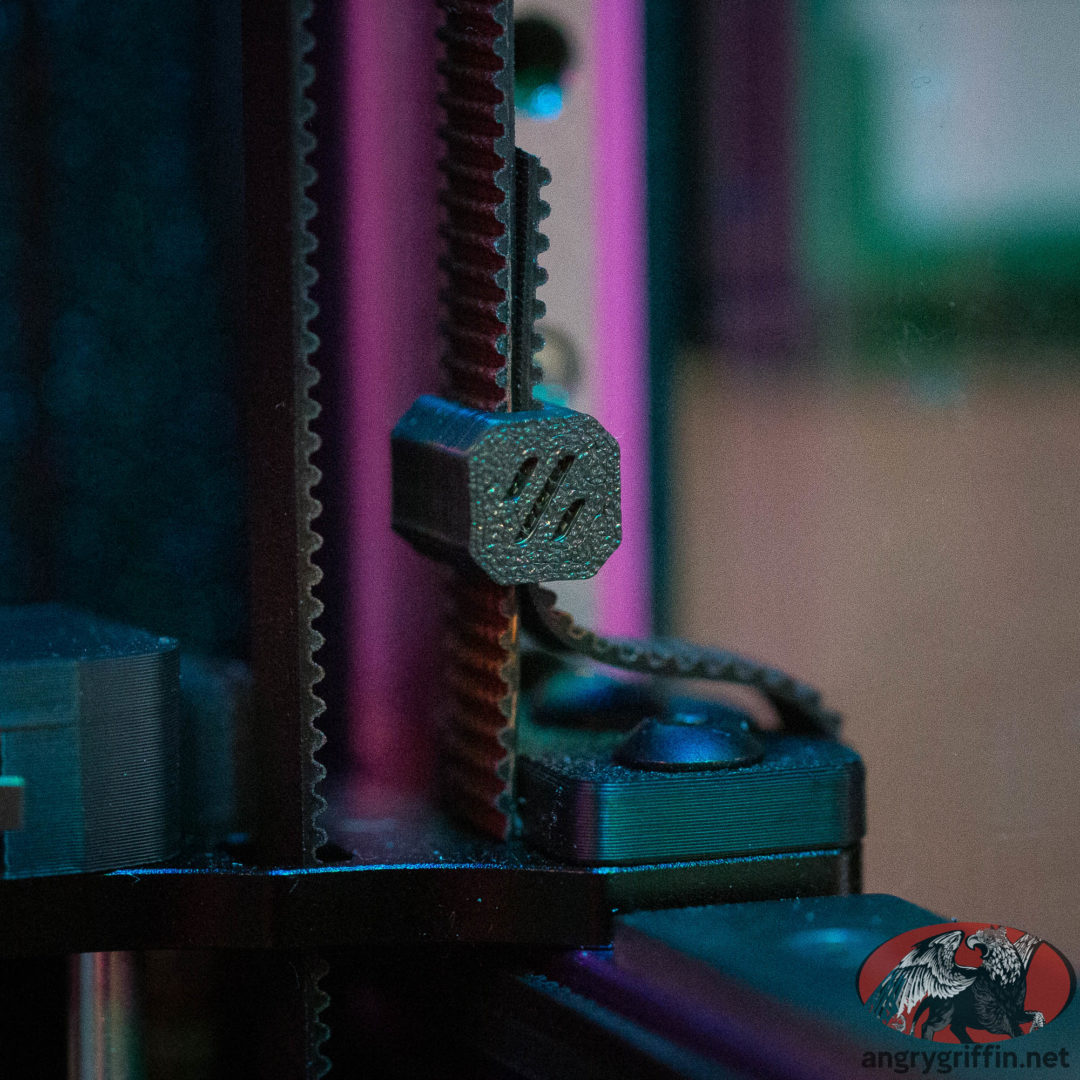
Not necessary but it’s a tiny STL and uses almost no filament… and it’s neater than using cable ties for keeping the Z belt excess tidy. Github here.
Cost: Negligible filament usage.
STL: Rama idlers
Skinnier and work just as well as the 2.4r2 stock ones. I used them on the 300 and like them. They’re necessary if you try out a Mantis toolhead and don’t want to lose X, and I’m not ruling out experimenting with that down the track. Github here.
Cost: Negligible amount of filament.
STL: Pins mod
This is seen on the Github repo here. Unique Prints’ carbon fibre X axis comes with a carbon fibre rod for the pins mod so this was no cost on top, the rod just had to be cut to size.
It means that the bearings ride on rods rather than threads, which is preferable.
Cost: Nothing. I didn’t need to reprint the A/B gantry pieces because they were aluminium, the Rama idlers are set up for the pins mod already and the XY joints for the carbon fibre tube assume you’re doing the pins mod.
STL: 1-0-R’s Handles
Best handles in the business. I like these better than the aluminium ones that come in the LDO kit – arthritic hands need good handles, especially with the heaviest of Vorons (well, not now that there’s a giant V24…). Github here. I use four so I have more options for how to carry depending on how my joints are going on any particular day.
Cost: 102gm per handle (408gm of ASA total).
Electronics: BigTreeTech Smart Filament Sensor
Bought from Unique Prints. It doesn’t make sense to me to run without a filament sensor, and this one is particularly good if a little finicky to get set up right – it can detect a nozzle blockage as well as a filament runout, and it actually works surprisingly well.
Trying out this mount – it didn’t play nicely with the height that the exhaust fan mount had the filament path set to, so I adjusted it to drop the sensor 36mm lower.
Cost: $26.95
Thoughts: 1000% worth the money – a runout sensor is a must for me and this one has consistently caught nozzle blockages or heat creep issues when they occur.
Hardware: BigTreeTech Octopus Pro
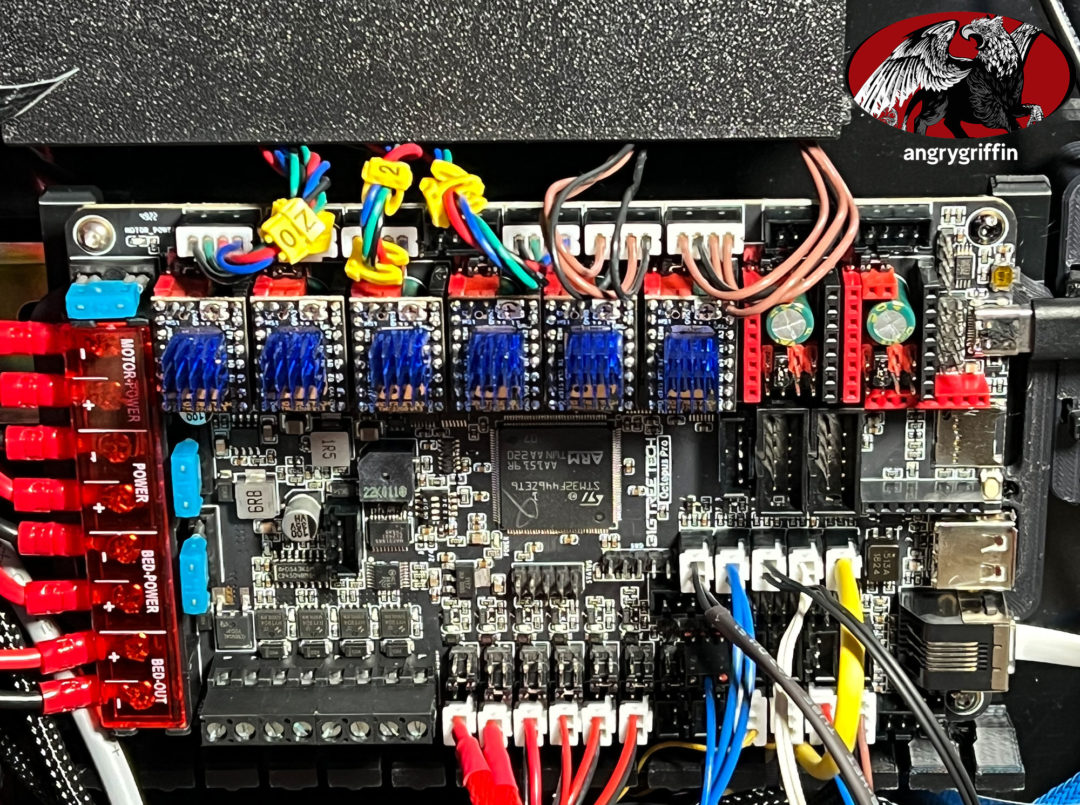
This has 48V support – which I’m not taking advantage of at this stage – but in the future, who knows. It came with the Unique Prints kit – I used the regular Octopus 1.1 on the previous Voron and there hasn’t been a practical difference so far.
To get the MCU temp to appear in Klipper I added this to the printer.cfg:
[temperature_sensor mcu_temp]
sensor_type: temperature_mcu
min_temp: 0
max_temp: 100
Cost: Included in the kit.
Electronics: Molex connectors
I picked up some additional Molex connectors to have plugs on the rear skirt to hook up the filament sensor and exhaust fans. 0430200608 and 0430250600.
The kit came with Molex connectors but it was less effort to merge the files which matched the above connectors with a skirt STL than measure and make the file for the connectors I have.
Cost: $14.03
Hardware: Meanwell UHP-200-24 PSU
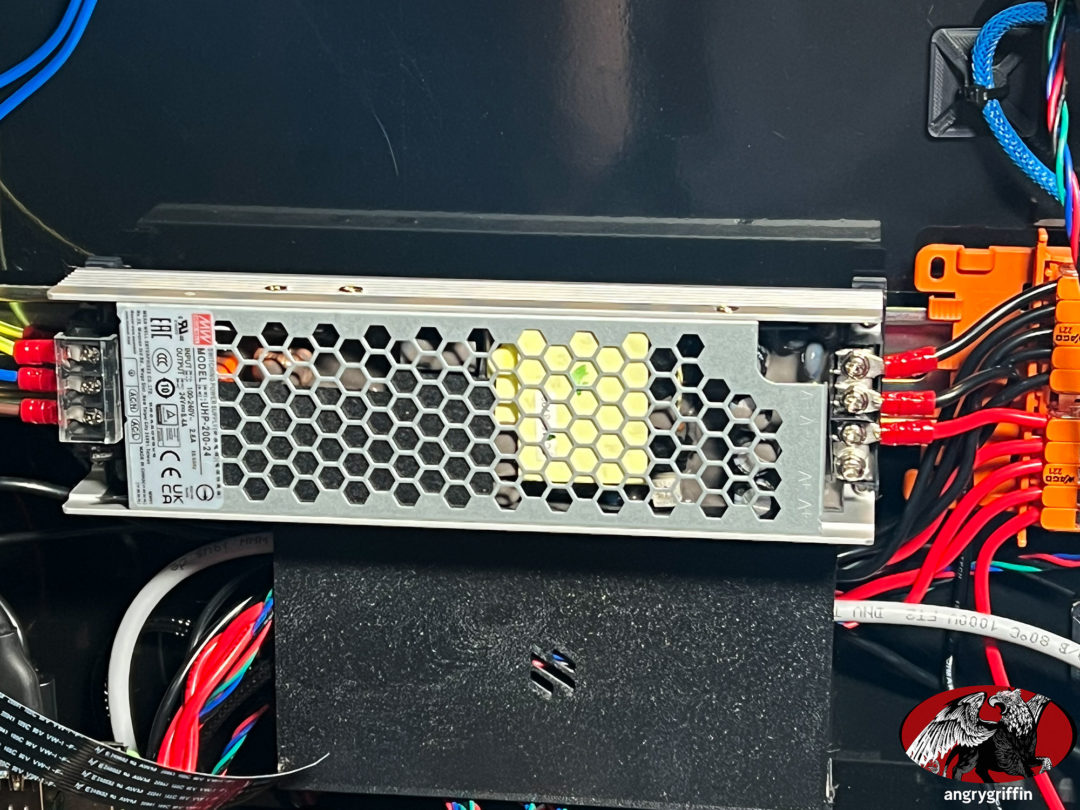
A much smaller PSU than the LRS, which gives me more breathing space under the bed for adding extra junk.
Cost: Included in kit after adjustments. Separate product page is here.
STL: Edward Yeeks’ Z Drive Motor Tensioner Mod
Makes the Z drive mounts beefier with more mounting points.
This one I had to make some changes to – the current bottom door mounting points don’t work with the STLs (wasn’t quite far enough away from the nearest obstruction) so I had to move the hole where the heatset was inserted, and the door fouls the arm that has the two new mounting points at the bottom – so I had to slim each one by about 1mm to get the door to sit without bending. Those issues aside, they do make for a nice sturdy mount for the Z drives and the rubber feet fit just fine.
I’d print them again.
Cost: Low amount of filament, especially since you’d be printing the stock mounts anyway.
STL: LDO’s beefy Raspberry Pi bracket
More sturdy than the standard one, I like it better. Github link.
Cost: Negligible difference in filament.
STL: Wile.e1’s Deck Clips
I like these better than the LDO twist-in ones – and they will hopefully keep the deck from bowing.
Cost: Very small amount of filament, a few M3 bolts and nuts.
STL: Gadgetangel’s Bed Alignment Tools
For the small amount of filament these make life easier putting the bed support rails in. I like them.
Cost: Small amount of filament.
STL: Triano’s Thermistor Mount
This time around I wanted a thermistor mount on the back of the gantry and since I had some laying around one low and one high in the chamber to get an idea of how fast or slow I needed to run the exhaust fans to achieve a given temperature. This mount worked perfectly.
Cost: Negligible amount of filament.
STL: Z chain relocated to beneath gantry
I used this one. I re-used the X and Y drag chains from the 300 build that were unused since moving to an umbilical setup, and routed it below the gantry to avoid collisions between the rear of the CB-C2 and the chain. If I had thought about this more from the start I would have taken some material off the deck where the cables now need to come through (back right) to make it a bit easier to route the cables around the Z belts etc. without fouling them.
STL/Electronics: Jaans’ Bouncy Mouse Buttons
As seen here on Github. I picked up two sets of 3 for the front of the 350.
Cost: $24.
Thoughts: I pressed the printer into service before printing the button covers for it or setting up the code, so check back for this one.
Electronics: Dupont-style connector kit and ferrule connector kit
Cheap bulk connector kit via eBay. I needed something to do the EBB36 and Jaans Bouncy Mouse connectors with for the former, and the hotend wires for the latter.
Cost: $14.39 for the Dupont-style and $20.18 for the ferrule kit.
Electronics: CANBus Chainflex Cable and PG7/M12 Cable Glands
So the only Chainflex available posted to Australia was a 50M roll of CF77.UL.05.04.D (RS Online), unfortunately, so I now have rather a lot to spare (slowly moving it on, let me know if you want some). I wanted to re-use the Chainflex I used on the 300mm (CF140.07.04.UL) but I found that it didn’t fit in the narrower X/Y chains that I was reusing as the Z chain, so I had to go skinnier.
It’s definitely more flexible and lighter, which is positive, and the PG7/M12 glands are notably smaller than the M16 glands I was using otherwise. I ended up using the M12 cable glands, though I had ordered a couple of different brands (of PG7 and M12 threads) to see whether there was much difference – there wasn’t.
Cost: $269.45 delivered for the Chainflex, $5.62 for the cable glands. Less $80 for resale of the CF77 so far.
Electronics: Wago mounts
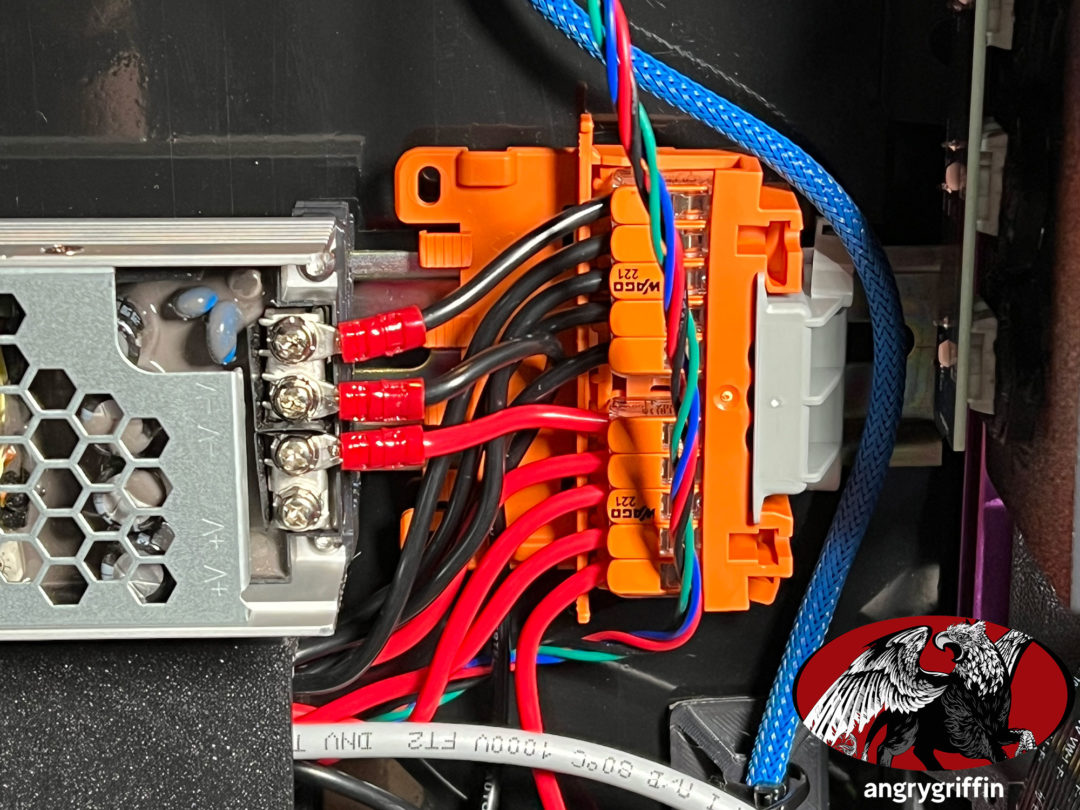
With additional mods and whatnot I needed more than the number of Wagos that came in the kit, so I picked up some extras.
Deepfriedheroin’s wago bed mount is great – Github link.
These STLs came out after I built it but I’d have a look at these Wago mounts which are separated and have room for labels underneath.
Cost: $92.40
Tool: IWISS HSC8 6-4 Ferrule Crimping Pliers
The EBB36 uses two ferrule connectors to hook up the hotend heater to the board, and the Engineer micro crimpers don’t do ferrules. I picked it up from Unique Prints.
Cost: $55.45.
Tool: Engineer PA-24 Crimpers
I had the PA-09 crimpers for the 300 2.4 build and while they were good they absolutely don’t do the Dupont style connectors that the EBB36 has for some of it’s plugs. The PA-24 does all that the PA-09 did as well as the Dupont style connectors, and I have used it for all of the small crimping on this 350. Purchased from Unique Prints.
Cost: $96.95
Tool: Engineer SS-10 Connector Extractor
With arthritic hands getting those little connectors out in tight spaces is hard. This little tool is bloody handy and I have used it a lot. Bought from Unique Prints.
Cost: $22.50
Filament: Polymaker ASA
I used this when printing Voron parts on a Prusa as it was easier to print than ABS and found I really liked the slightly matte look it has. I picked up a 3KG roll to get the Voron parts done in.
Cost: $145.90
Hardware: Additional Thermistors
I used a spare Prusa bed thermistor for an upper chamber thermistor and bought two HT-NTC100K thermistors from 3D BRO – one for the back of the gantry and one for the bottom of the chamber. There’s a decent number of thermistor ports on the Octopus Pro, might as well get some use out of them.
Cost: $11

STL: Snap Latches
These are very good – I ended up using 5.5mm depth on the sides and they really do make getting the panels on and off easy, except for the great big handles up the top that slightly obstruct removal. Github link. I used ten per side, eleven at the back and eight at the top because the handles cover a fair bit of the top space.
Cost: About 360gm of filament for that number of latches.
STL/Hardware: Bed Bumpers
I drilled and tapped some M4 threads into the back of the bed and printed a block with holes in it to act as a bump-stop for the build plate. How long will the printed ASA last for? Who knows! Someone on the Aussie Bogans Discord suggested using a washer on the bolts for a simpler and more long lasting solution which I will do if/when the printed parts fail.
STL: Modified front skirts
I wanted to block off the holes in the front to encourage airflow to go from side to side (and discourage people from sticking stuff in there), but for three holes on each side for the Bouncy Mouse buttons. Easy enough to do, and cost barely any additional filament vs. printing them stock.
Hardware: Label Tape
I picked up some Brother TZeN201 Labelling Tape so I could put labels on the Wago mounts – with 40+ of the things it’ll save mistakes down the track. Bought on eBay.
Cost: $31.90
STL: Rear gantry umbilical mount with Y endstop
This is a couple of different STLs kludged together, along with a bumper that sits on the right XY joint.
STL: Z belt covers
I can’t find where I got these files from, but they’re called Anti-Crap Z Belt Covers. The protrusion above the deck level encourages debris to not fall down and cause issues in the gears/belts.
I had to modify the front right one so that the K3 style door magnet holder would fit.
STL: Upper mount for K3 style door
This one is fairly simple – I just rotated and union’d the upper magnet holder so that it attached to both the upper and right extrusions. Why? I had some corner joints in the other three corners that bolted to both the upper and side extrusions, and for a small amount of effort this kept that consistent.
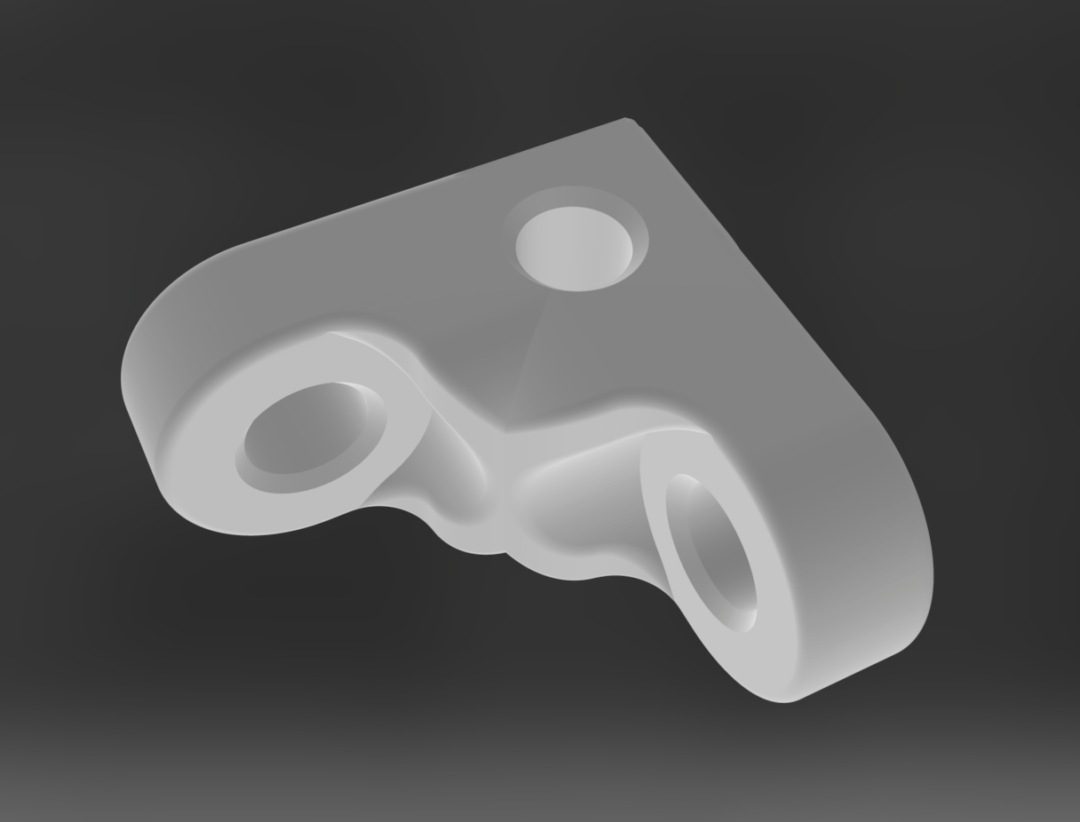
Cost: Negligible amount of filament.
Hardware: LDO Corner Pieces
I had these left over from an unused Bear Frame build and was tired of moving them around, so I bolted them into the upper frame corners. At some point I may unbolt them to see if anything changes on the input shaping graphs but I doubt it, and now I no longer need to keep track of them!
Cost: Already had.
STL: 5V PSU Mount
I never liked how the default RS25 mount allowed the PSU to rotate, so I made a plate that attached to the PSU and to two DIN mounts to make for a more solid connection to the DIN rail.
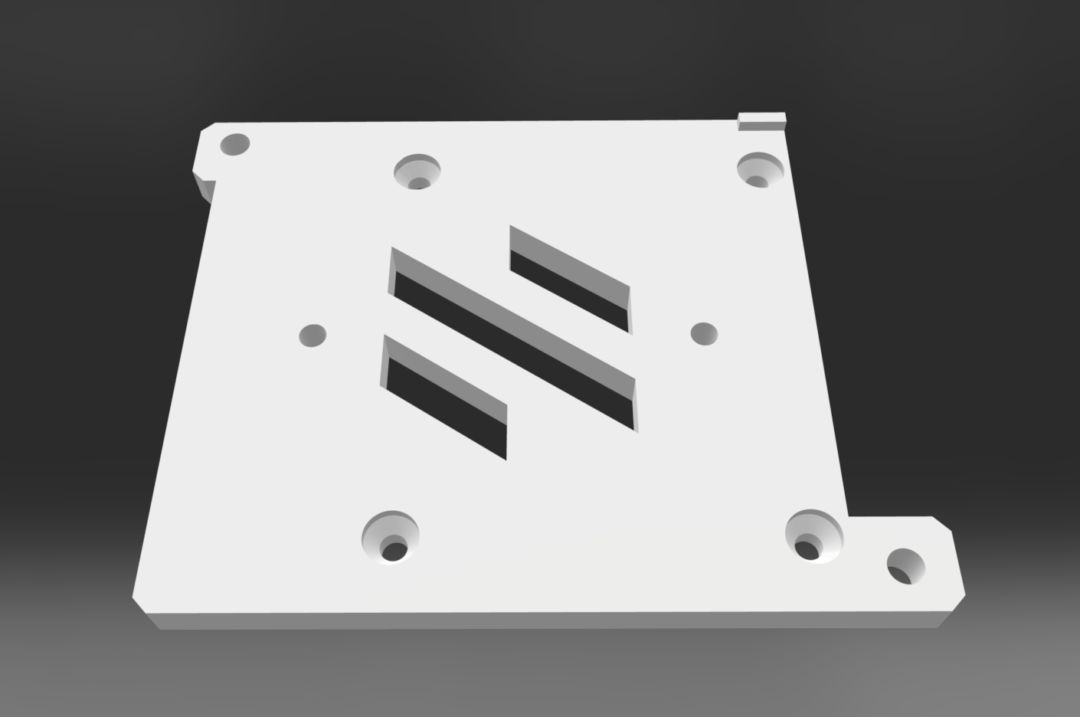
Cost: Small amount of filament.
STL: Modified rear skirt for Molex connectors
Merged these files with the standard skirt to make life easy when connecting/disconnecting the exhaust fan or BTT filament sensor.
I didn’t look far enough ahead because the 5V PSU fouls one of the ports, but in the end I went with a single 120mm exhaust fan not the twin 60mm so it didn’t make a difference. The Molex plugs definitely benefited from some hot glue around them to make sure that they didn’t shift when being plugged or unplugged.
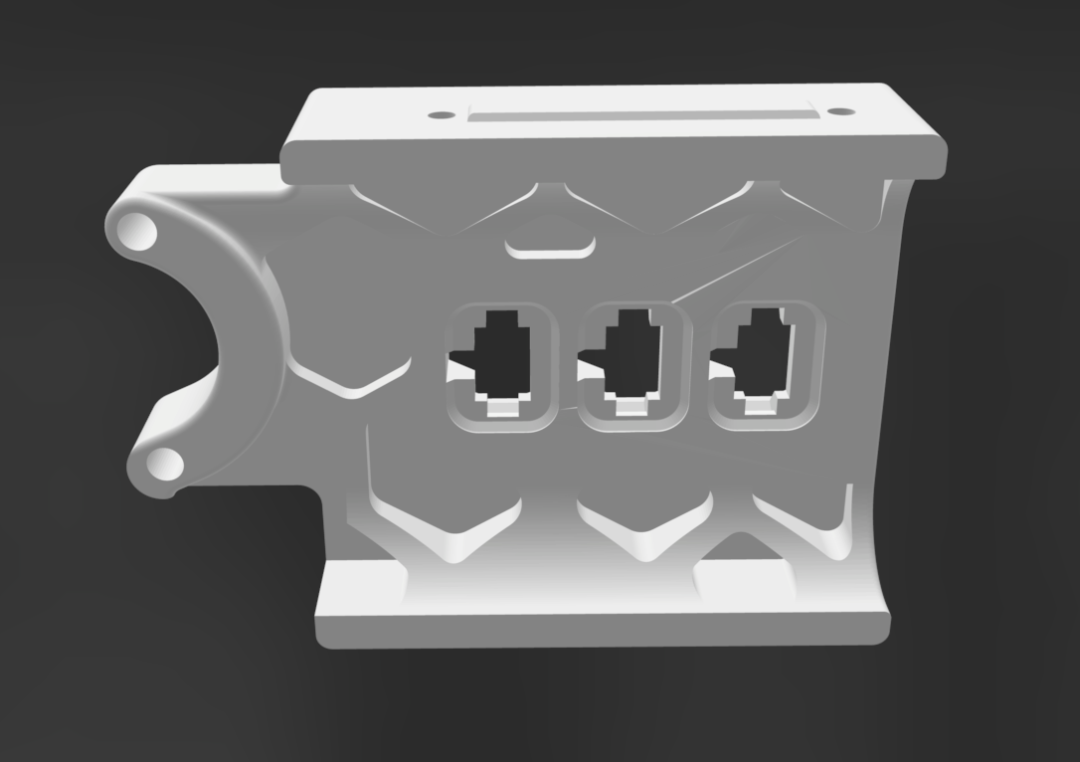
Cost: Basically zero difference vs printing the stock ones.
STL: Cable ducting
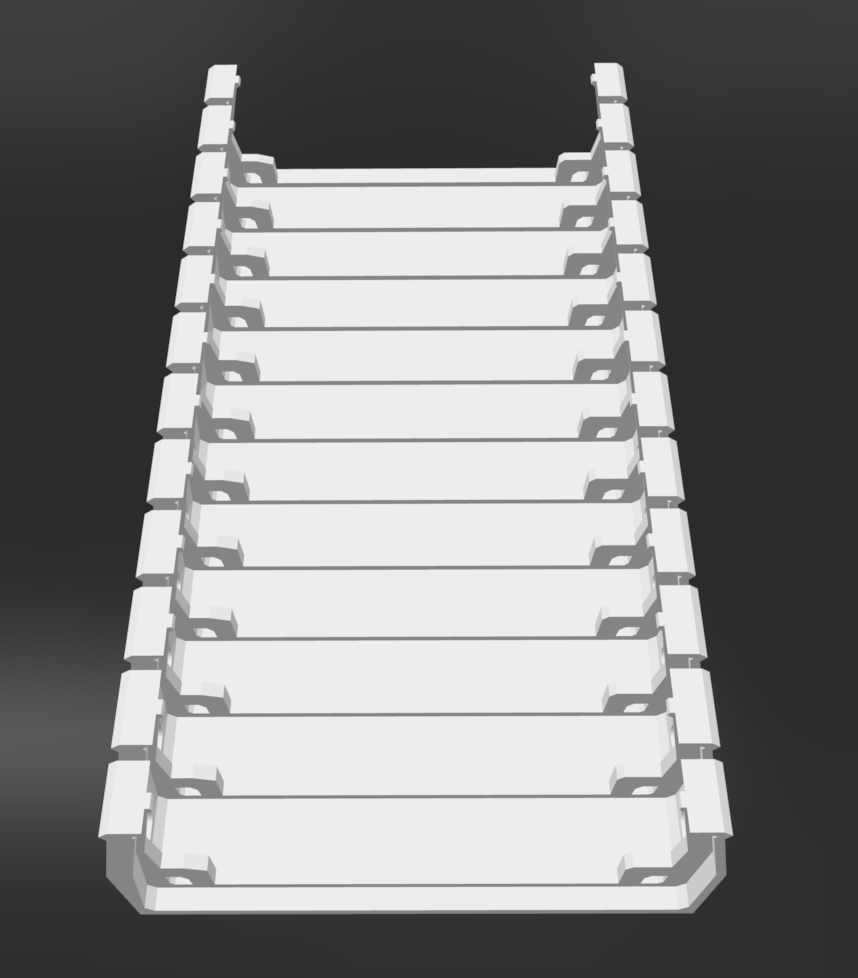
I found a cable duct STL and stiffened it up a little by doubling the thickness of all of the fingers and enlarging it – one for either side of the Octopus.
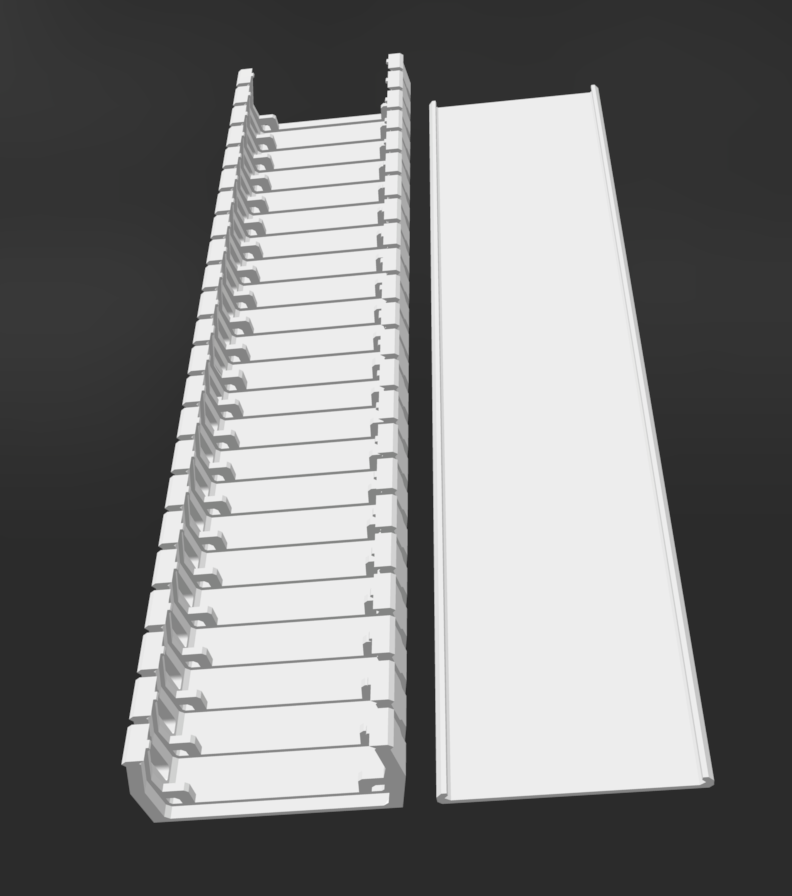
Hardware: 1N4148 Diode
I periodically had weird readings and constant running with the 300’s hotend fan tacho on the EBB36 and after following this thread I think that the diode may be the answer.
Cost: $11.31 to get here.
Hardware: RJ12 cable for CANbus
I ran about a 2″ section of RJ12 cable (RJ11 with unused wires) into a Wago and from there I went with Chainflex. While I did contemplate using an empty socket and a punch down tool to make the RJ11 cable… it was pretty quick and easy to just buy a short cable from Jaycar and cut the end off.
Cost: $11.95 from Jaycar.
Hardware: Noctua 120mm Exhaust Fan NF-F12-iPPC-2000-PWM
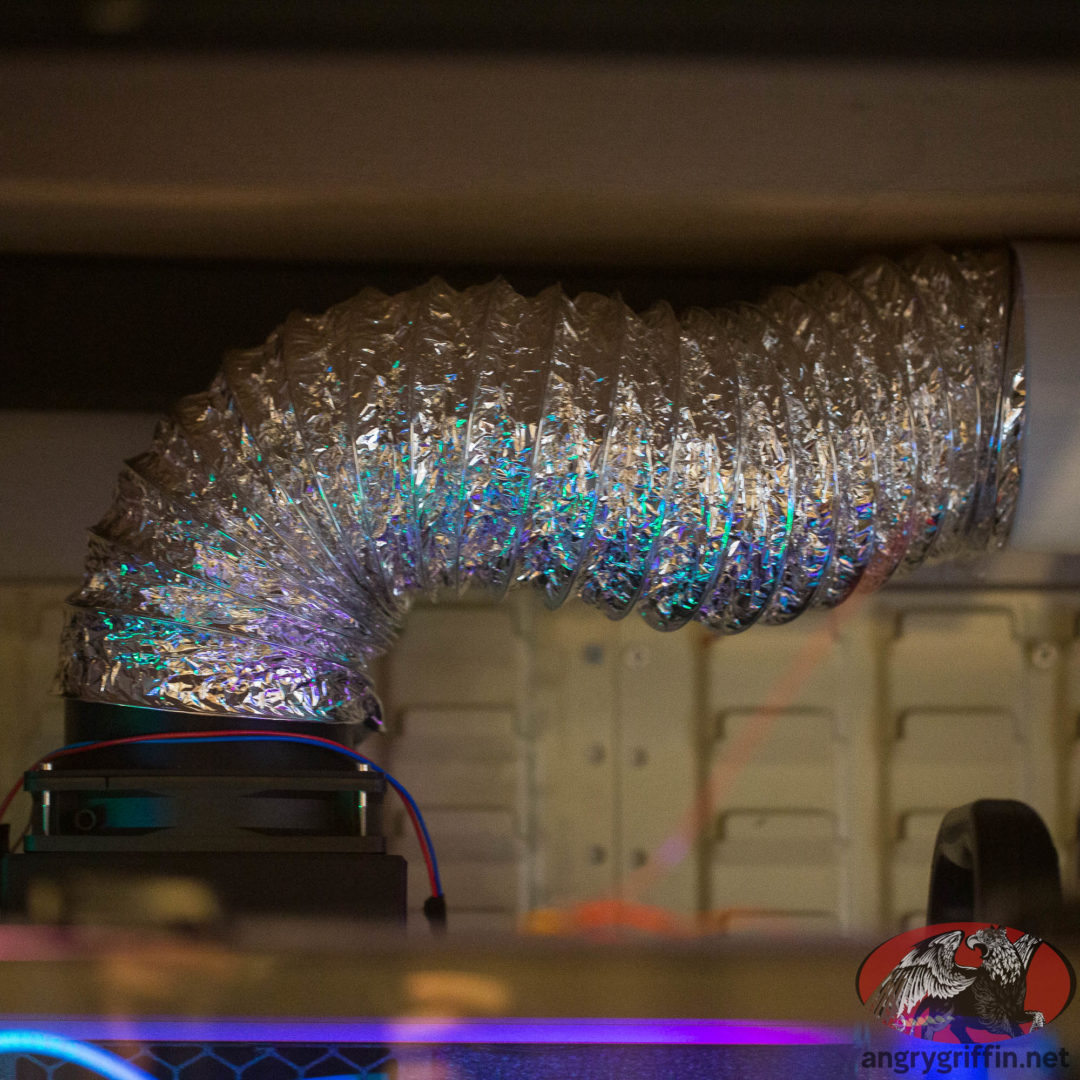
Trying to cut down noise again – and the Scythe fan I used in the first instance was ineffective at actually clearing the air from the chamber. Quieter than the GDSTimes I was going to use by a fair margin and moves a decent amount of air – should be enough for PLA!
Cost : $59.
STL: 120mm Exhaust Housing
From Github. Works as suggested.
Cost: A little bit of filament.
Usage Log
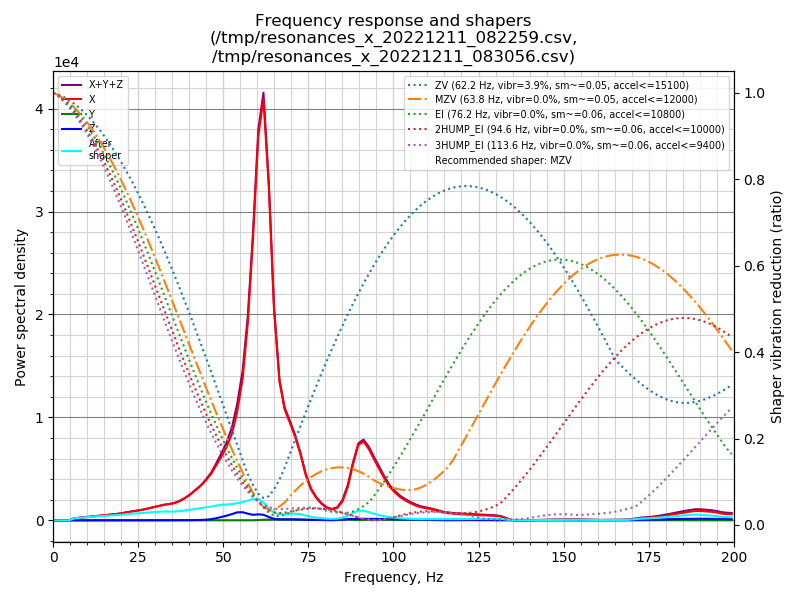
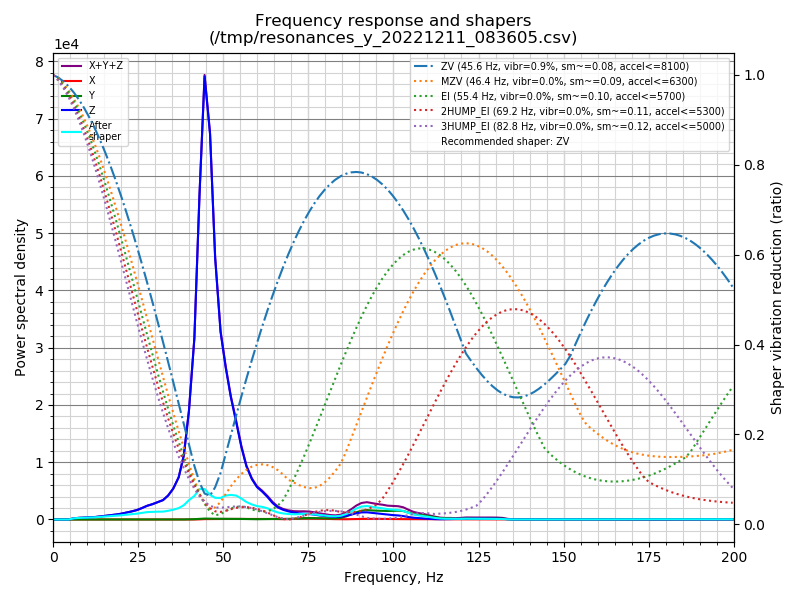
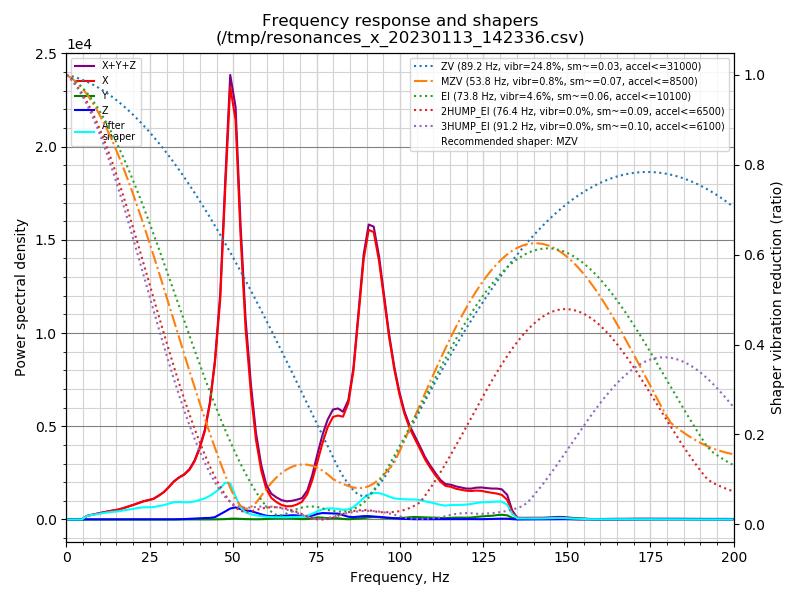
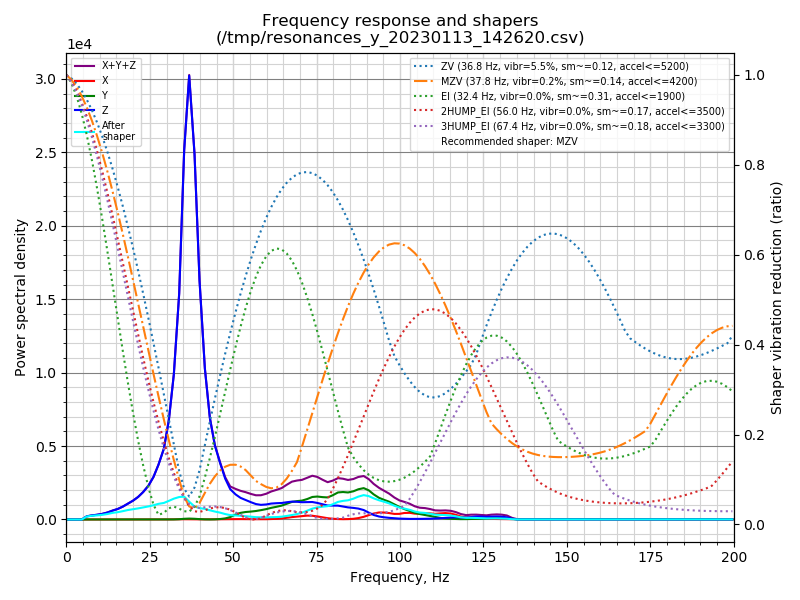
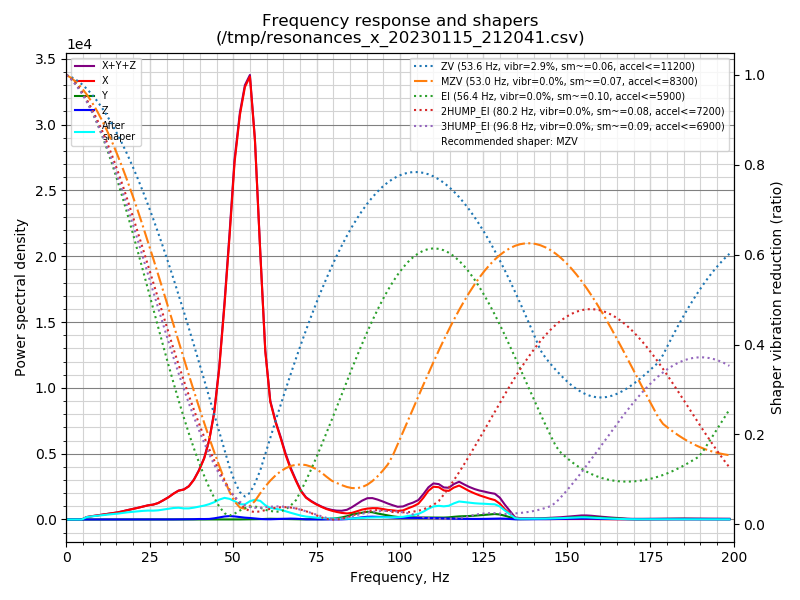
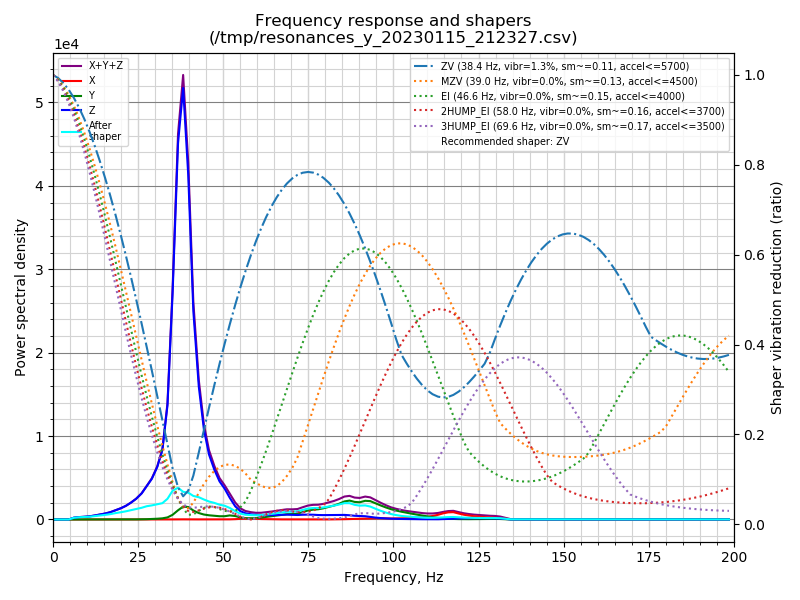
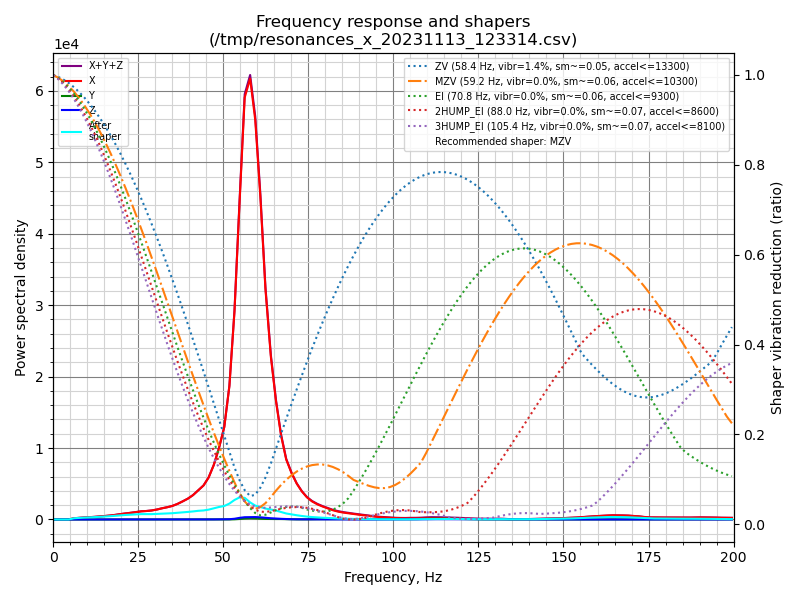
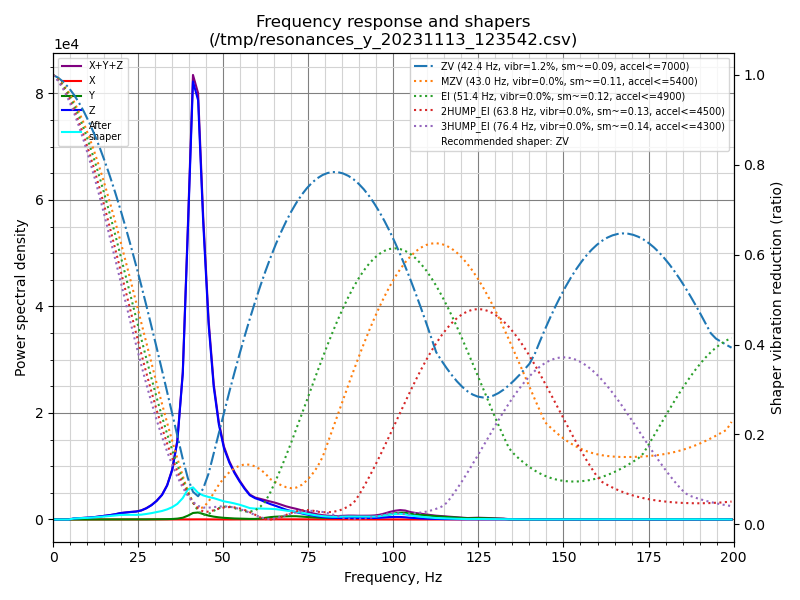
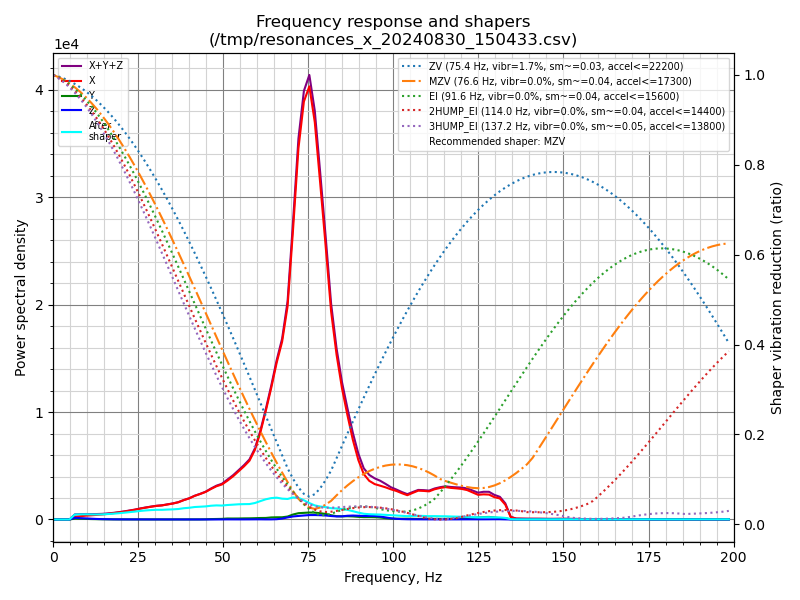
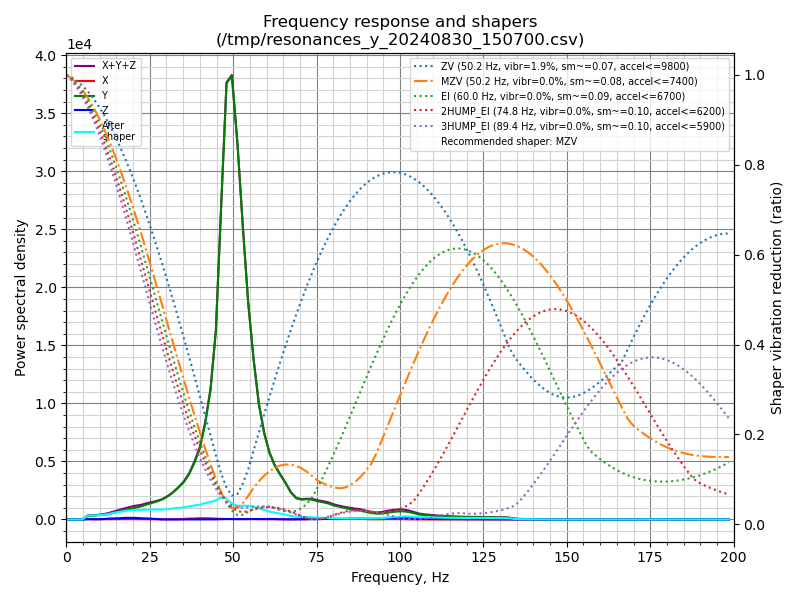
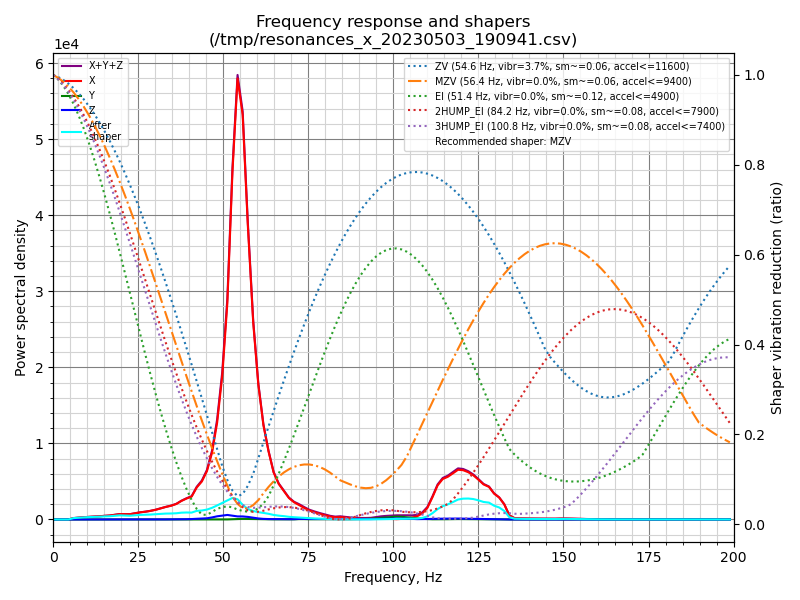
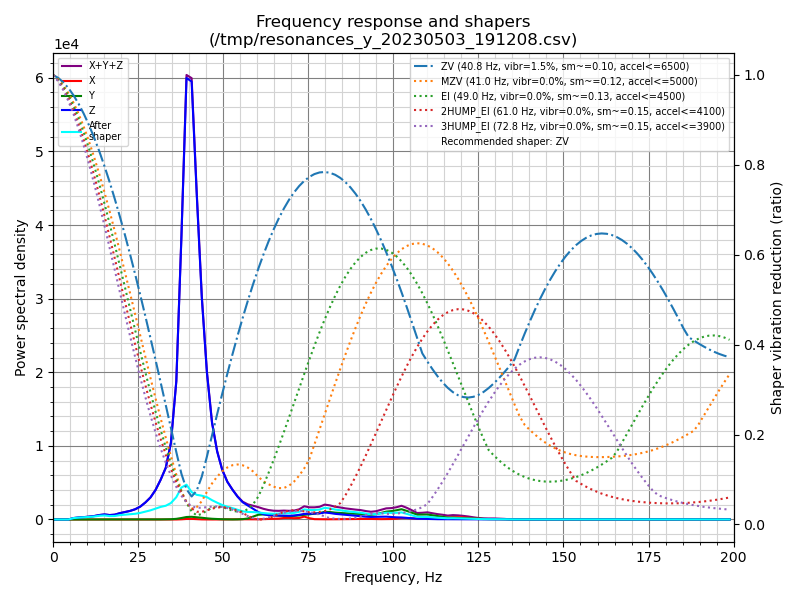
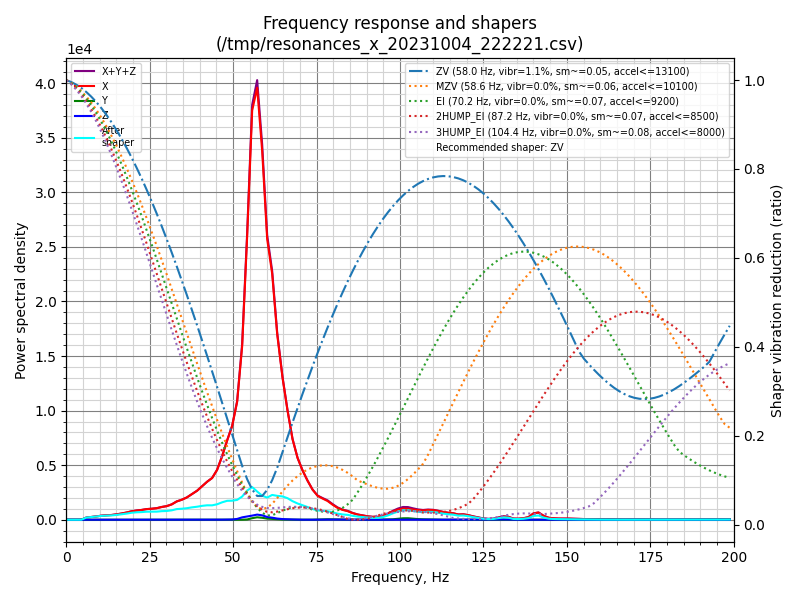
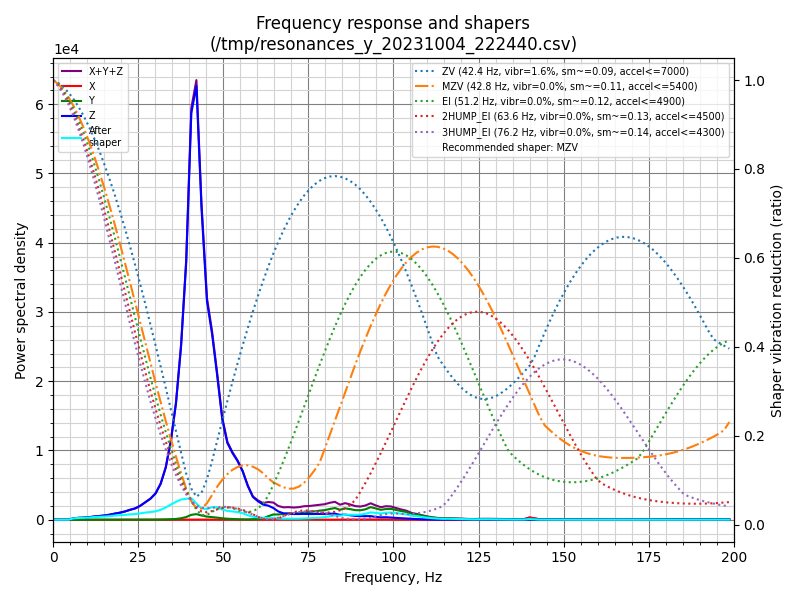
10 hours, initial input shaping graphs
Calibration finished – delayed for a few hours because I didn’t notice I had set the pressure advance smooth time to 0.2 rather than 0.02. Oops.
Tap R6 graphs:
I moved to the R8 version of Tap after a couple of hours of calibration:
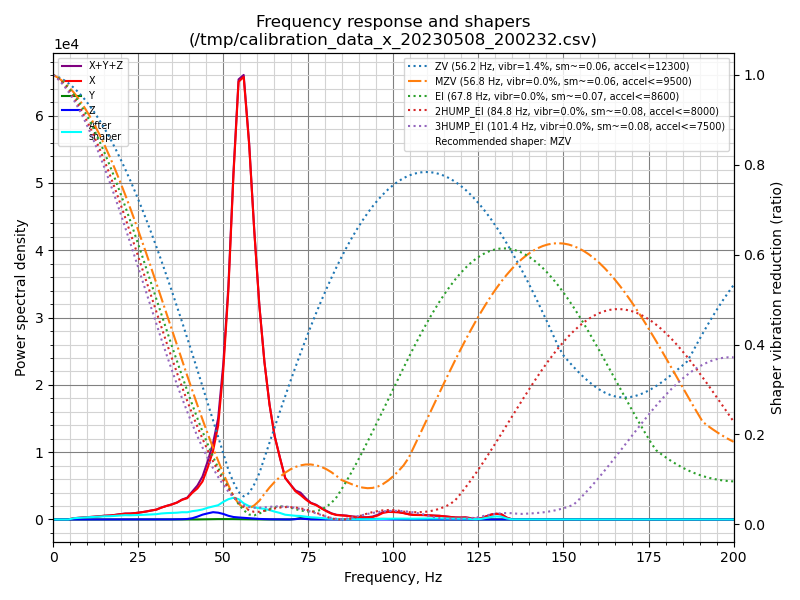
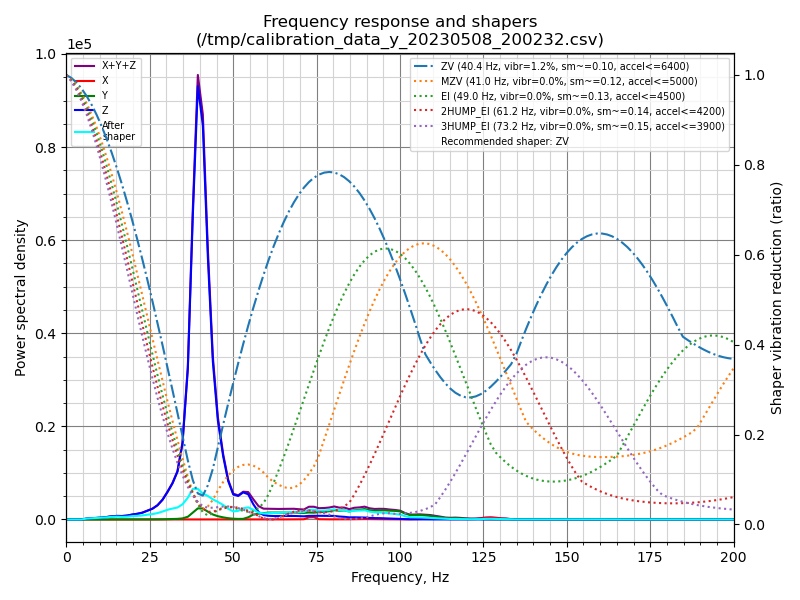
X improved substantially, Y…. not so much. The printer is comfortably printing in production at 7k internal perimeters and 3.5k external perimeters as it stands, and I’ll look into what I can do about improving the Y result down the track.
100 hours
Ended up settling on 6k internal/3k external perimeter accelerations to save me from having to remember to use different speeds for each Voron. I have been very impressed by the VZ-Hextrudort-Low – it has been running at 1A with no issues at all so far.
I forgot to lubricate the gears in the Hextrudort so that has been resolved, and I also installed the Noctua 120mm exhaust fan at this point as the Scythe one was doing absolutely nothing and you could smell the PLA printing from the outside of the enclosure, which shouldn’t happen if there was negative pressure.
150 hours
Started doing some ABS, found that running the Hextrudort at 1.0amps with a chamber temp of about 57degC resulted in the gears getting so hot that the PLA I tried to print afterwards turned to taffy and made a heck of a mess in the extruder. It’s meant to be used at 0.8 or below. Oops. Installed the diode on the hotend fan tacho cable while I was at it and that resolved the always-on nature of the fan.
Hotend 255, bed 105, Nevermore @ 100% on one side, bed fans @ 100% and exhaust @25% resulted in a chamber temp of 57deg with an ambient of 20deg.
Hotend 255, bed 105, Nevermore @ 50% on one side, bed fans @50%, exhaust @25% gives a chamber temp of 50deg.
Running the chamber temp above 55deg causes the one-piece door to warp enough that it breaks free of the magnets and sits ~20mm proud on the far side from the hinge. Keeping it below 55 prevents this. Looking at clips so I can print at higher chamber temps but the snap latches don’t work due to the presence of the side panels – going to make some alterations to them.
Playing around with the Probe Accuracy plugin – found here.
300 hours
With high chamber temperatures (55-60deg) the rear panel is warping enough that it’s fouling on the belts – I’m going to replace it with ACM. Otherwise printing very well.
400 hours
Rear panel replaced with ACM (via Bunnings), took only a few minutes to cut with an angle grinder + cutting disk after using the old panel as a template. Zero warping now, very pleased. The chamber temp now settles at 59-64deg, measured at the back of the gantry. Increase in temp chamber-wide or just more heat being reflected back at the thermistor?
Cost: $23.49.
Also kludged together a STL for the one-piece door to stop it from bowing during high chamber temps – working well.
450 hours – Rapido 2 installed.
Had no orders for a minute so decided to have a crack at a 0.6mm nozzle and tune that. It took the deflecting beam torque wrench an unusually long time to click and the hotend temp started dropping, never to rise again. I swapped in a spare and we’re back in business. I’m not sure what happened there – my nozzle change technique hasn’t changed and there’s been no other issues with the Rapido on my 300. Go figure.
I ordered a Rapido 2 to replace it with – it was $70 for just the heater block replacement on the old type or $145 for the updated version which has a replaceable thermistor, which could save money down the track. $145 from 3DBro.
500 hours – Tweaked crowsnest.conf, camera now working
Finally took the time to get the Raspberry Pi Camera working. crowsnest.conf looked like:
[cam 1]
mode: camera-streamer
port: 8080
device: /base/soc/i2c0mux/i2c@1/imx708@1a
resolution: 1536x864
max_fps: 15
The device was found in ~/printer_data/logs/crowsnest.log and the missing piece of the puzzle ended up being the missing camera-streamer, which was resolved by running make install from the ~/crowsnest/ directory.
I had to adjust the Z belt tension and ended up finding that the Redoubt idlers were just too darn hard to make adjustments with, even with the tool I made. I replaced them with the pins mod Z tensioners (Github here).
The bed bumper on the back left had dropped a little so I pushed it back up and tightened the bolts.
550 hours – Tap magnets adjusted
First layers suddenly became all over the place, and after taking the extruder off and tightening the bolts for the tap bearing I realised that it was the magnets that were loose. Tightened them up again and we’re back in business.
Replaced the hotend PTFE tube (34mm) with a Capricorn one that was 39mm – I think the insufficient length was the cause of debris getting stuck upon filament ejection.
A few hours later the ejected filament jammed somewhere in the extruder and when I pulled off the Stealthburner to see what was going on the ground wire pulled off the parts cooling fan. At least that only took a few minutes to fix.
600 hours – Swapped Rapido 2
The filament was getting jammed every ejection, so I swapped in a Rapido 2 I had as a spare to see if that improves things. So far so good. The 300mm Voron had no issues with this at all in over 2500+ hours of printing so I don’t think it’s specifically a Rapido problem.
675 hours – Added Klipper Auto Tune plugin
No more filament jams… so far, anyway.
Trying out this Klipper auto tune plugin for the motors. Seems to make them run a bit more quietly.
Ordered parts for this belt tension meter.
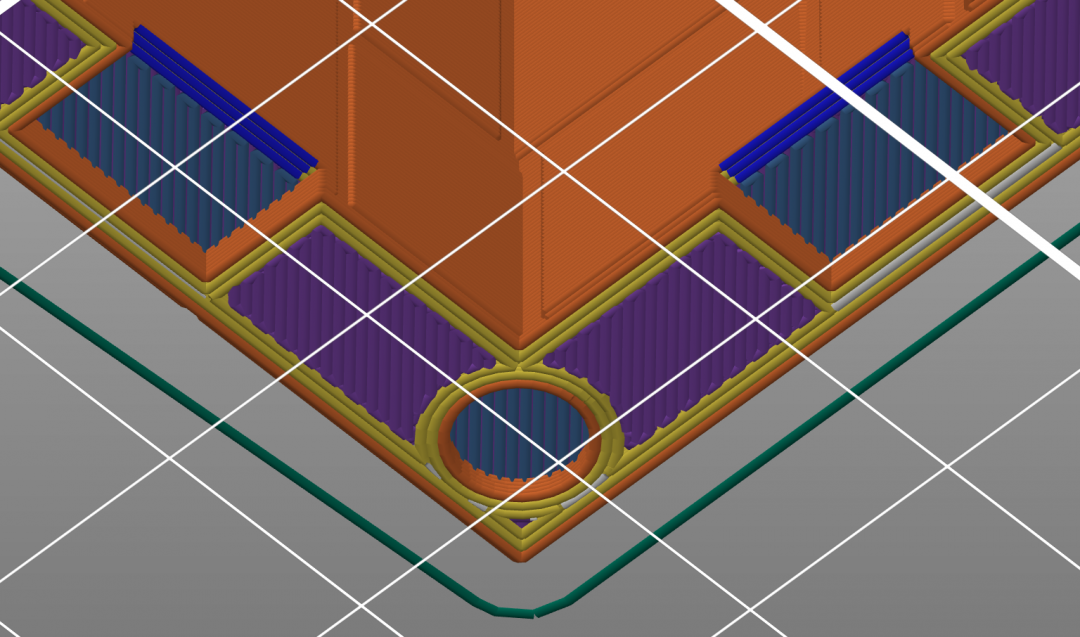
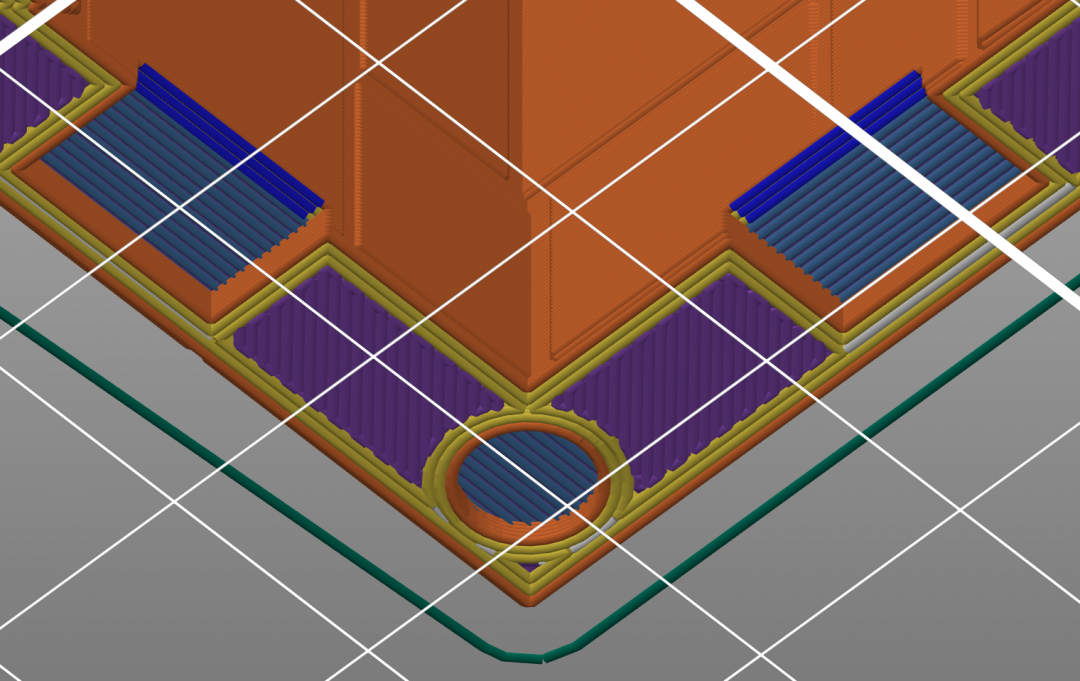
Forgot I had not set up the Fast Gyroid Infill scripting for this printer’s profiles. For some reason the standard .py was not working and I had to change the start of the file from #!python to #!/usr/bin/python3 as Prusaslicer was giving a bad interpreter error, which oddly Superslicer does not with the same file. For your own system you can find out your Python3 path with “which python3”.
900 hours – adjusted Tap magnets
Tap is acting a bit oddly – when printing ABS the offset drifts slightly every print to the tune of about 0.075, which is fine if I keep on adjusting it for consecutive prints but then when I go back to PLA I get a “probe triggered before movement” error on QGL on the back left corner. Only the back left, never on the others, and it’s resolved by loosening and tightening the Tap magnets again.
Hmm.
950 hours – Replaced extruder motor
The Moons motor on the Hextrudort-Low started making a creaking noise and when I opened up the toolhead there was rusty looking brown gunk around the shaft. Replaced it with an LDO with 10 teeth and changed the rotation distance from 22.054600 to 27.927740 and less than half an hour later the printer is back up and running with no creaking noises.
1000 hours – Pushover added
Had a go at this Python script to send messages via Pushover – I’m a fan as it means I don’t have to have Telegram installed any more.
364 jobs, ~15km of PLA used, which is about 45kg – approx. 45gm an hour, putting it at 1,080gm/day which aligns with how often I have to buy it – so I think Klipper’s records seem reasonably accurate.
1550 hours – No issues, 64.6kg PLA used so far
569 jobs, 64.6kg of PLA used, longest print time so far 20 hrs and 27 mins.
1600 hours – New nozzle, unnecessarily
I thought the nozzle was partially clogged, replaced with a Phaetus copper plated 0.4mm – whatever came stock with the Rapido. Turns out it wasn’t the nozzle at all but the red eSun PLA just wasn’t keeping up with 25mm^3/s – unlike the black and grey I use 99% of the time. Ah well. Cranked the PLA up to 235 and it’s printing at 25mm^3/s.
1695 hours – printed TAP fault
Tap started drifting substantially – more than 0.15mm per print – one of the magnet heatset inserts seems to be spinning and what I presume is that magnet is audibly rattling on fast movements. Time to replace it.
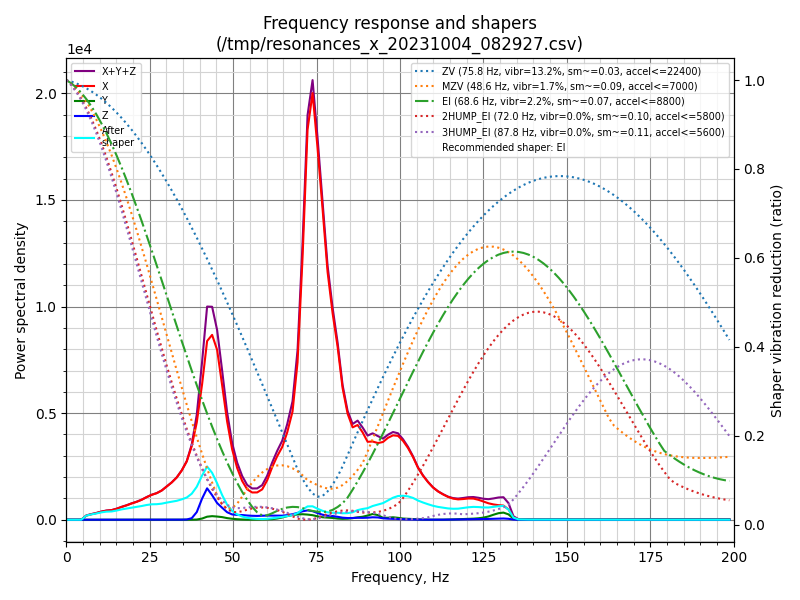
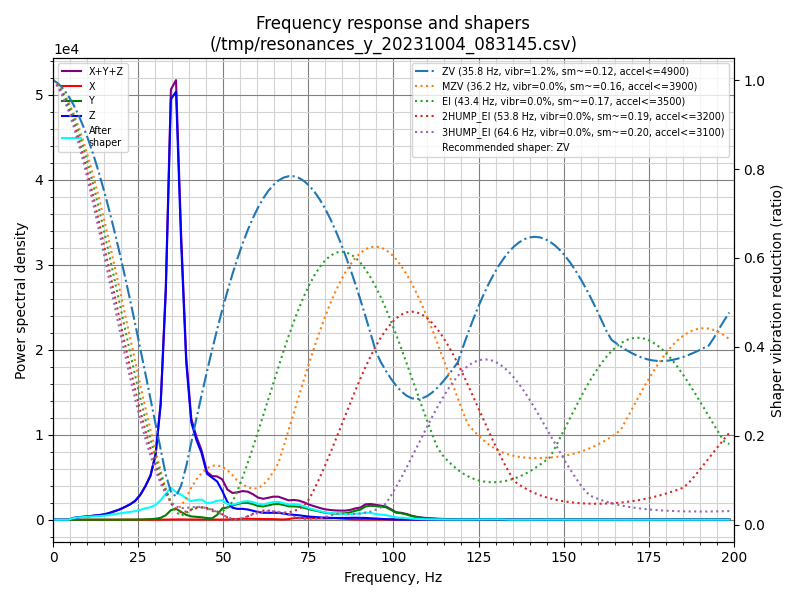
1695 hours – metal tap installed
Picked up a metal tap kit for $118.21, installed and woohoo:
1935 hours
Mainsail reported that Klipper had become corrupted somehow, so I ditched the repo and reinstalled it.
Had to quickly re-run the install scripts for:
- TMC Autotune
- Klipper LED Effects
- Push Notify (not really a script, just putting the .py back)
2217 hours – Added BTT SFS 2.0 filament sensor.
The printer moved location and the rear exhaust had to be reprinted so that the filament inlet was on the left, not the right. I took the opportunity to ditch the original BTT smart filament sensor for the BTT SFS 2.0 – seems like a much better unit and it’s actually working this time, where the original was pretty flaky.
3084 hours – Nozzle change.
Filament got stick when mid-change, and I took off the nozzle to clear it – replaced with a brand new brass 0.4 nozzle while it was off.
4190 hours
Both 2.4s threw a “timing too close” error on the same morning and would not print. One was showing a low voltage warning; I turned the voltage up from 5.05 to 5.15V and the errors went away and both are now printing fine again.
4450 hours
Tap misread the bed height and started the print far too high, resulting in a blob of doom. Took a full 30 minutes to clear the plastic off and get the printer back to working. Had to replace the Rapido silicone sock as the plastic had made it’s way all up around it and it tore when the plastic was removed.
The tap mechanism seems fine mechanically, I need to run some tests to see if it’s amount of variance has changed.
New nozzle while I was there.
4870 hours
Some routine maintenance and an upgrade to XOL.
One of the Z tensioners had a small crack in it so I replaced the tensioner brackets and tensioners – none of the others had an issue but it seemed prudent.
Moved to Beacon. Very impressed.
New bearings all around for the A/B belt path – one of the bearings in the 300 2.4 had failed around 5k hours and I didn’t feel like having the gantry apart again any time soon, so I changed the 350 ones out while I was working on it.
New A/B belts while I was changing the bearings.
Replaced the EBB36 with a Nitehawk 36 to gain the USB expansion port on the toolhead so I didn’t have to run an additional cable along the umbilical for Beacon. This necessitated adjusting the file for the exhaust housing so I could run the USB cable through it as well as the PTFE tube.
All rails re-lubriated. X rail replaced with a CPC item.
Pi replaced with a Pi 5.
The Nitehawk36 ended up failing miserably (unlike the one in the 300, which has been marvelous) and the four replacement boards I got also failed with a variety of USB disconnect errors, timing errors or simpy does-not-appear-in-the-OS issues. The Pi was swapped, the USB splitter swapped, the USB ports swapped, the power supply upgraded to make sure it wasn’t a lack of power, the toolhead cable changed… etc. etc. – no dice. Will have to wait until December for the re-designed NH36 boards.
In the meantime… back to the EBB36, with a fresh umbilical routed through the exhaust using some leftover Chainflex. Knocked accels down about 1400 from where Xol/Beacon/NH36 was, largely due to the additional wires run along the umbilical I imagine (Beacon and 5V for the hot end fan).
4951 hours
Moved to a 0.5mm Bondtech CHT nozzle. Easily hitting 30mm^3/s where previously I was at 25mm^3/s with the regular 0.4.
